        import socket
        import subprocess
        import signal
        import os

        local_ip = ""
        port = 5000

        receiver_socket = socket.socket()
        receiver_socket.setsockopt(socket.SOL_SOCKET, socket.SO_REUSEADDR, 1)
        receiver_socket.bind((local_ip, port))

        receiver_socket.listen()
        sender_socket, sender_address = receiver_socket.accept()
        print("Connection established with:", sender_address)

        current_process = None

        def kill_current_process():
            global current_process
            if current_process is not None:
                os.killpg(os.getpgid(current_process.pid), signal.SIGTERM)
                current_process.wait()
                current_process = None

        try:
            while True:
                received_data = sender_socket.recv(1024)
                if not received_data:
                    break
                received_message = received_data.decode().strip()

                print(f"Received message: {received_message}")

                # Kill current process if there is one
                kill_current_process()

                # Start new process based on the received message
                if received_message.startswith('art'):
                    current_process = subprocess.Popen("sudo -E python3 drawWithGesture.py", shell=True, stdout=subprocess.PIPE, stderr=subprocess.PIPE, preexec_fn=os.setsid)
                elif received_message == "seg":
                    current_process = subprocess.Popen("sudo -E python3 imageSegmentation.py", shell=True, stdout=subprocess.PIPE, stderr=subprocess.PIPE, preexec_fn=os.setsid)
                elif received_message == "pose":
                    current_process = subprocess.Popen("sudo -E python3 pose2Display.py", shell=True, stdout=subprocess.PIPE, stderr=subprocess.PIPE, preexec_fn=os.setsid)
                elif received_message == "disco":
                    current_process = subprocess.Popen("sudo -E python3 disco.py", shell=True, stdout=subprocess.PIPE, stderr=subprocess.PIPE, preexec_fn=os.setsid)
                elif received_message.startswith("gal_"):
                    image_name = received_message.split('_')[1]
                    current_process = subprocess.Popen(f"sudo -E python3 saved.py {image_name}", shell=True, stdout=subprocess.PIPE, stderr=subprocess.PIPE, preexec_fn=os.setsid)
                elif received_message == "kill":
                    subprocess.Popen("sudo reboot", shell=True, stdout=subprocess.PIPE, stderr=subprocess.PIPE)
                    break

                if current_process:
                    print(f"Started process with PID: {current_process.pid}")

        except Exception as e:
            print(f"An error occurred: {e}")
        finally:
            kill_current_process()
            print("Connection closed. Exiting.")
            receiver_socket.close()
            sender_socket.close()
Objective
The objective of this project is to develop a smart art installation that allows users to interact with and draw on the LED matrix using gesture-based inputs. The interface will harness pose information to enable intuitive and engaging art creations.
Project Video
Introduction
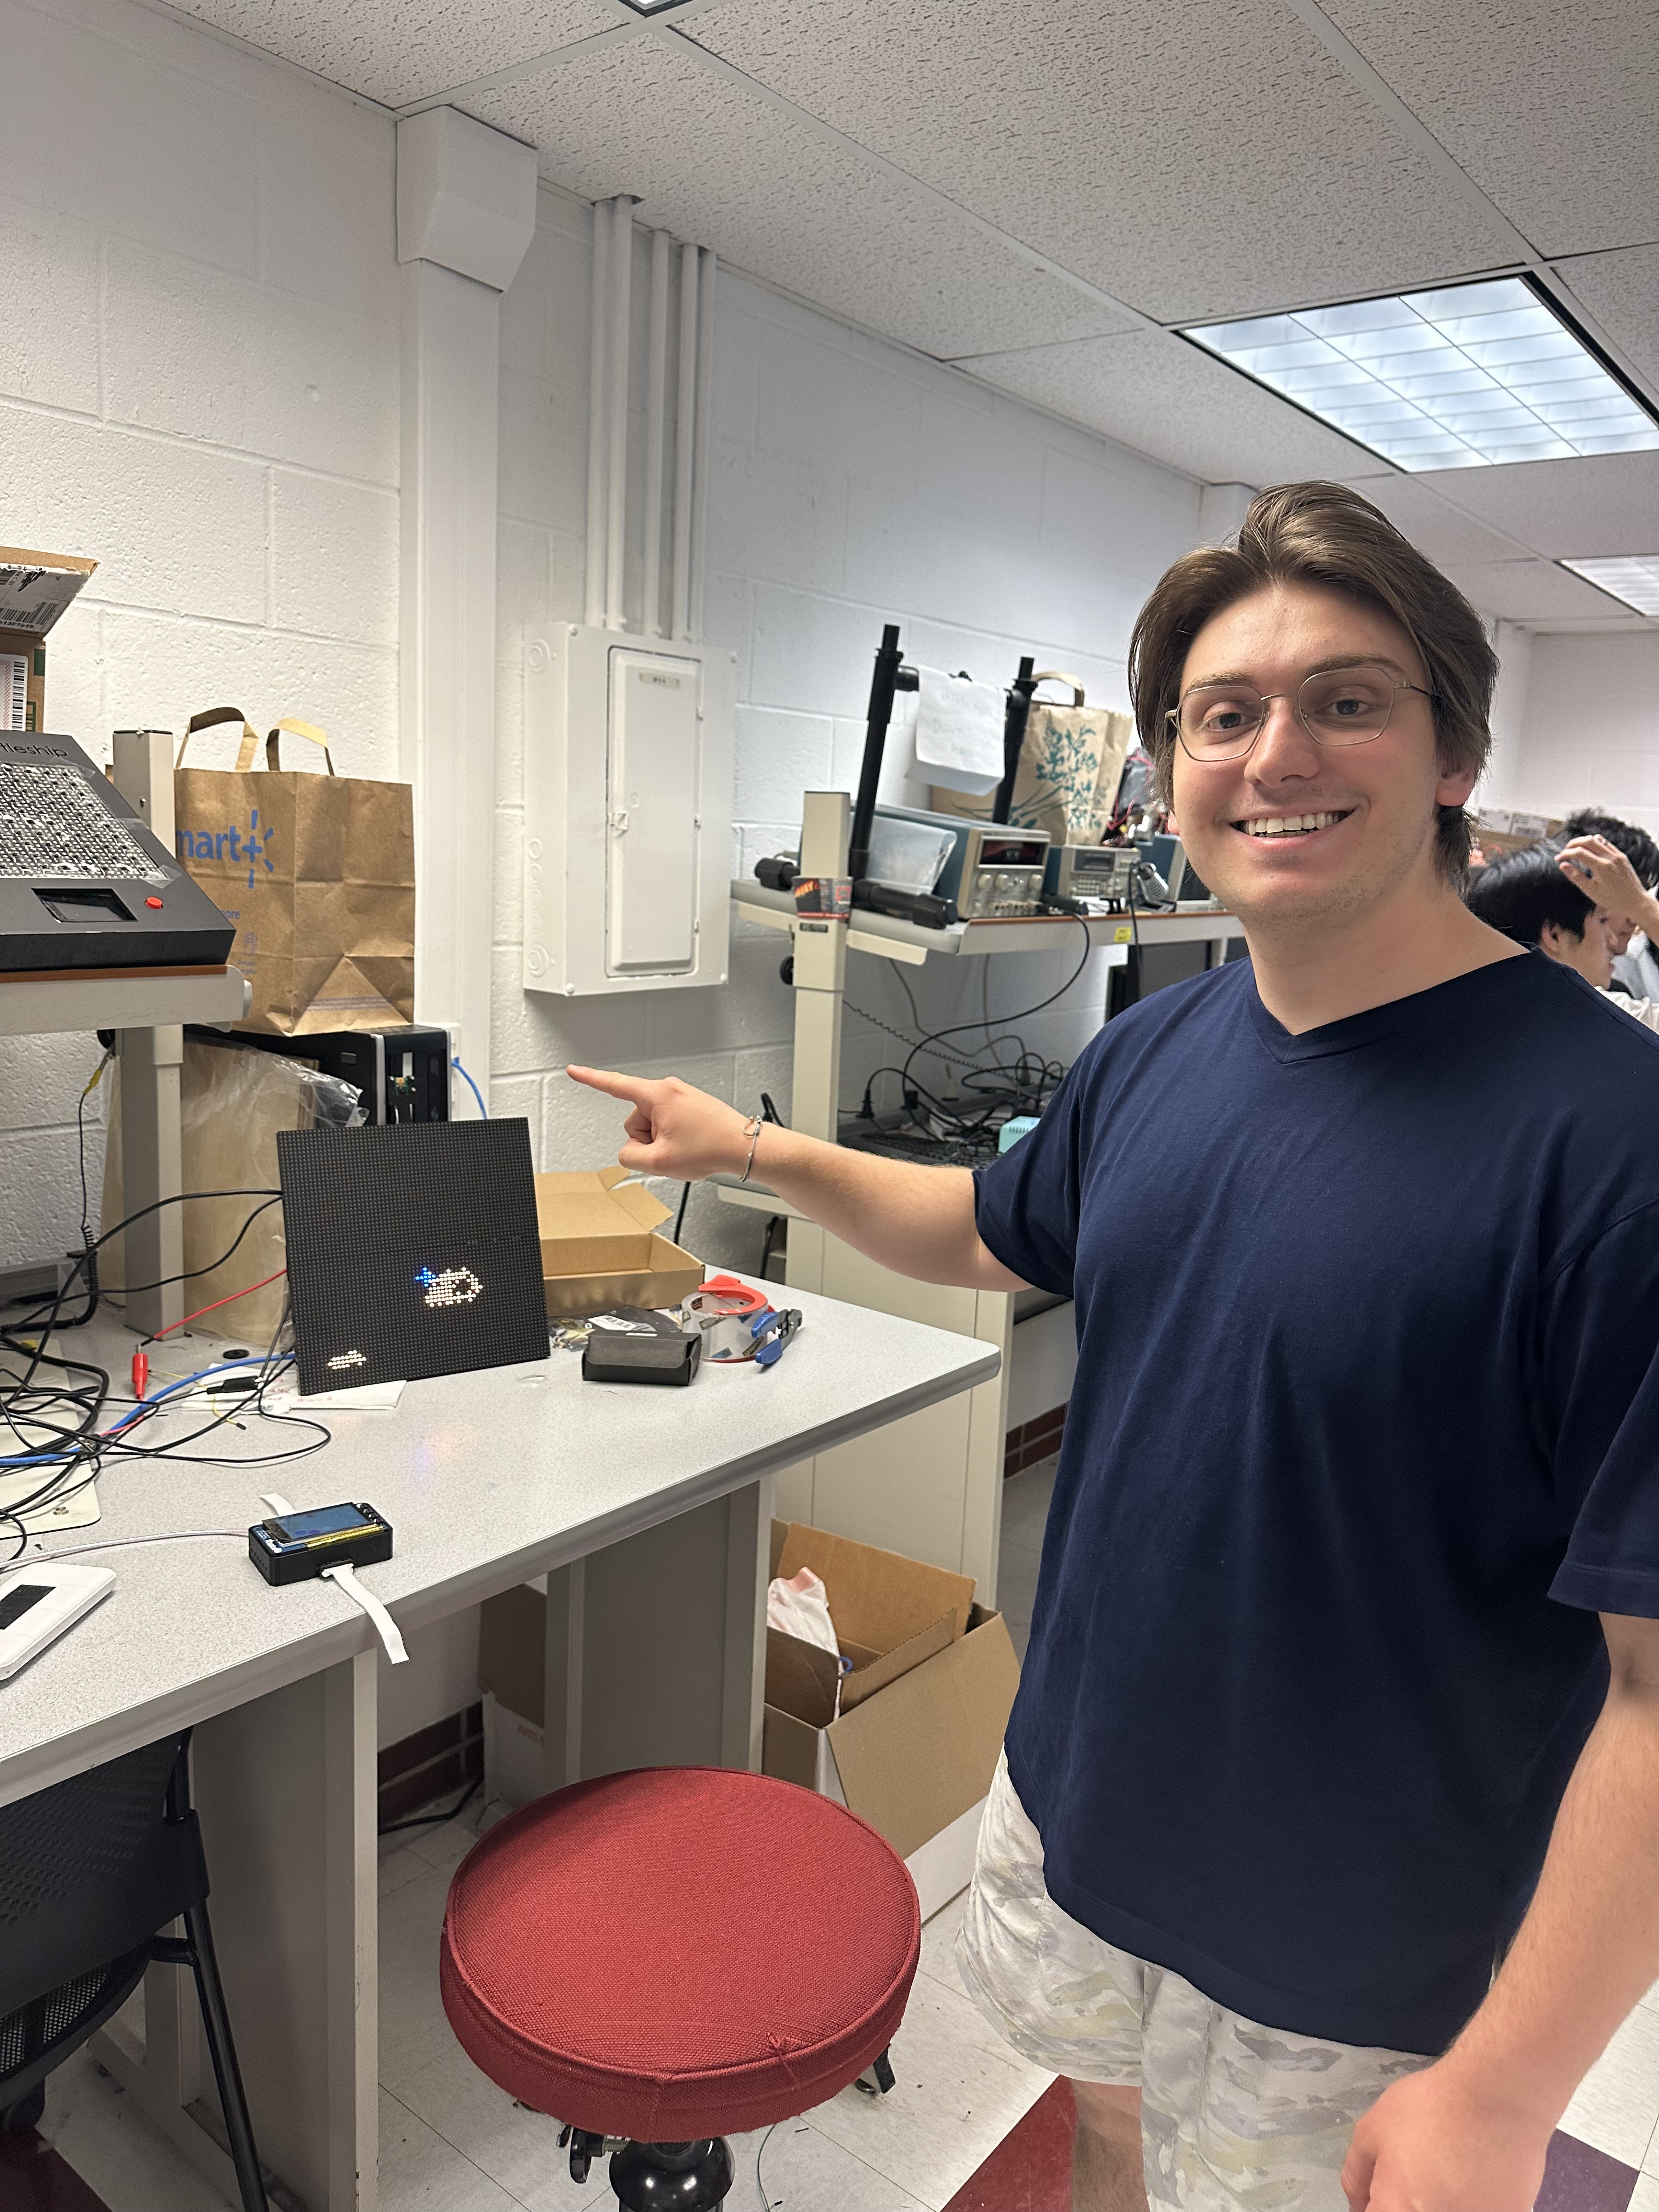
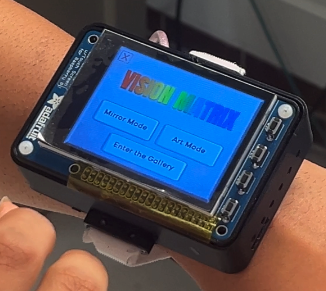
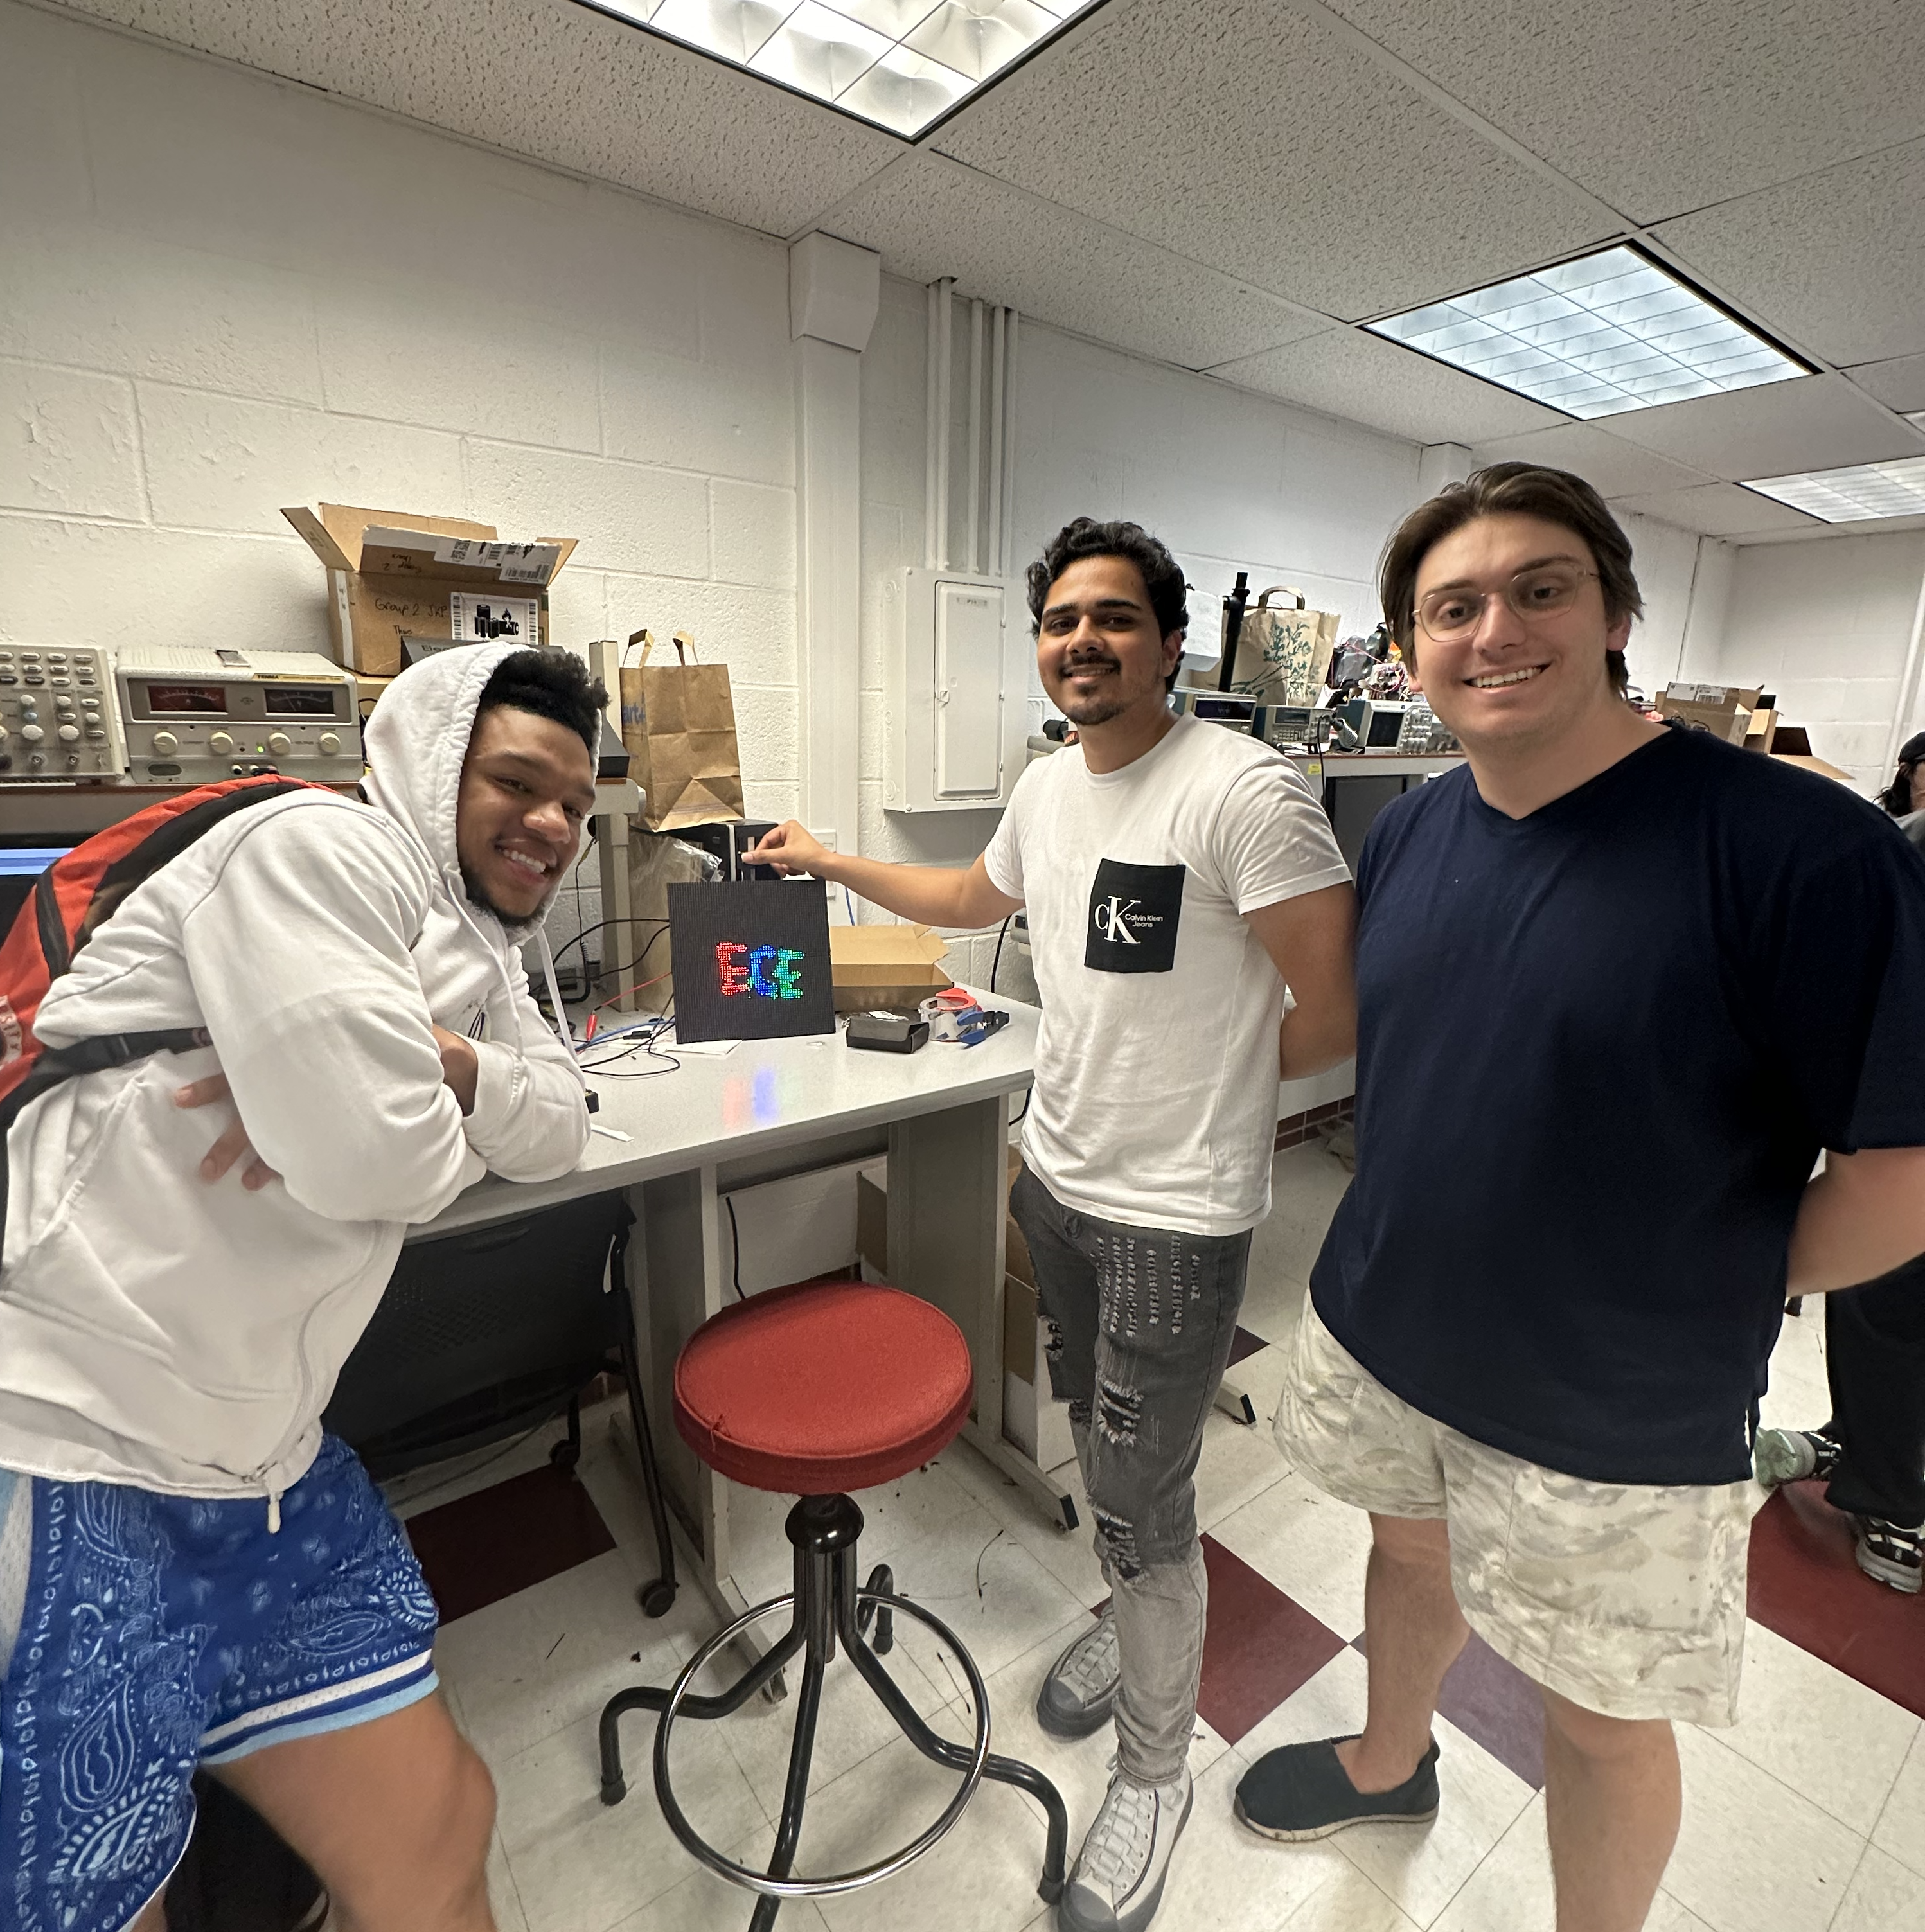
In this project, we developed Vision Matrix, an interactive art installation designed to engage users through dynamic visual representations. We utilized a combination of two Raspberry Pis, a PiTFT display, an LED matrix, and a camera to bring this concept to life. The installation captures the intersection of technology and art, transforming real-time video data into interactive displays on an LED matrix.
The Vision Matrix operates through a dual-system setup. The primary Raspberry Pi processes video inputs to create real-time art manifestations such as silhouettes and gesture drawings, which are then displayed on the LED matrix. The secondary Raspberry Pi serves as an interactive control panel via the PiTFT display, allowing users to select between three modes:
- Mirror Mode: Mirrors users' movements and gestures.
- Art Mode: Allows users to draw freely and choose colors.
- Gallery Mode: Displays a collection of previously saved drawings.
Design and Testing
In this section, we are going to discuss the design, testing, and any issues that we ran into. This includes the front-end, display & back-end processing, back-end communication protocol & code processing, and the mechanical components.
Front-End
Design
The Vision Matrix’s front-end is designed using Pygame to offer an interactive interface that allows users to navigate between three distinct modes. Each mode is linked to specific functionalities and socket communications with a server for further processing.
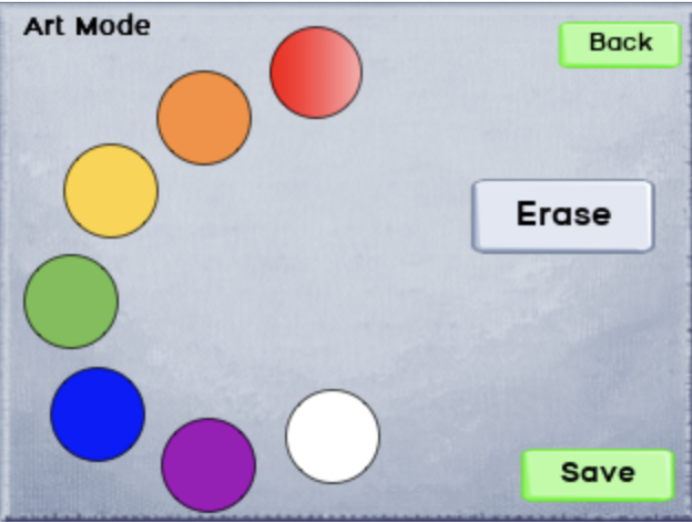
- Art Mode: In Art Mode, users can engage with an interactive drawing feature on our LED display. The mode intends to allow users to express themselves artistically by providing them a selection of colors. Users can browse through these colors and use them to draw directly onto the LED display. Drawings created in this mode are stored and can be viewed later in the gallery, allowing users to illustrate their artwork at their convenience.
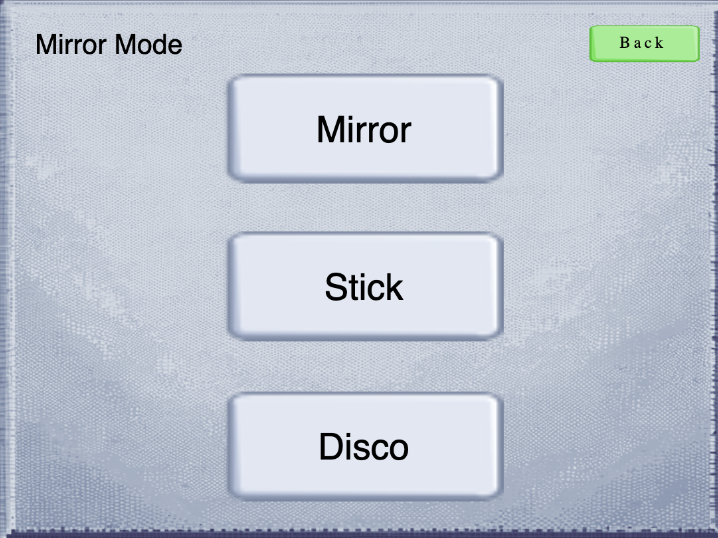
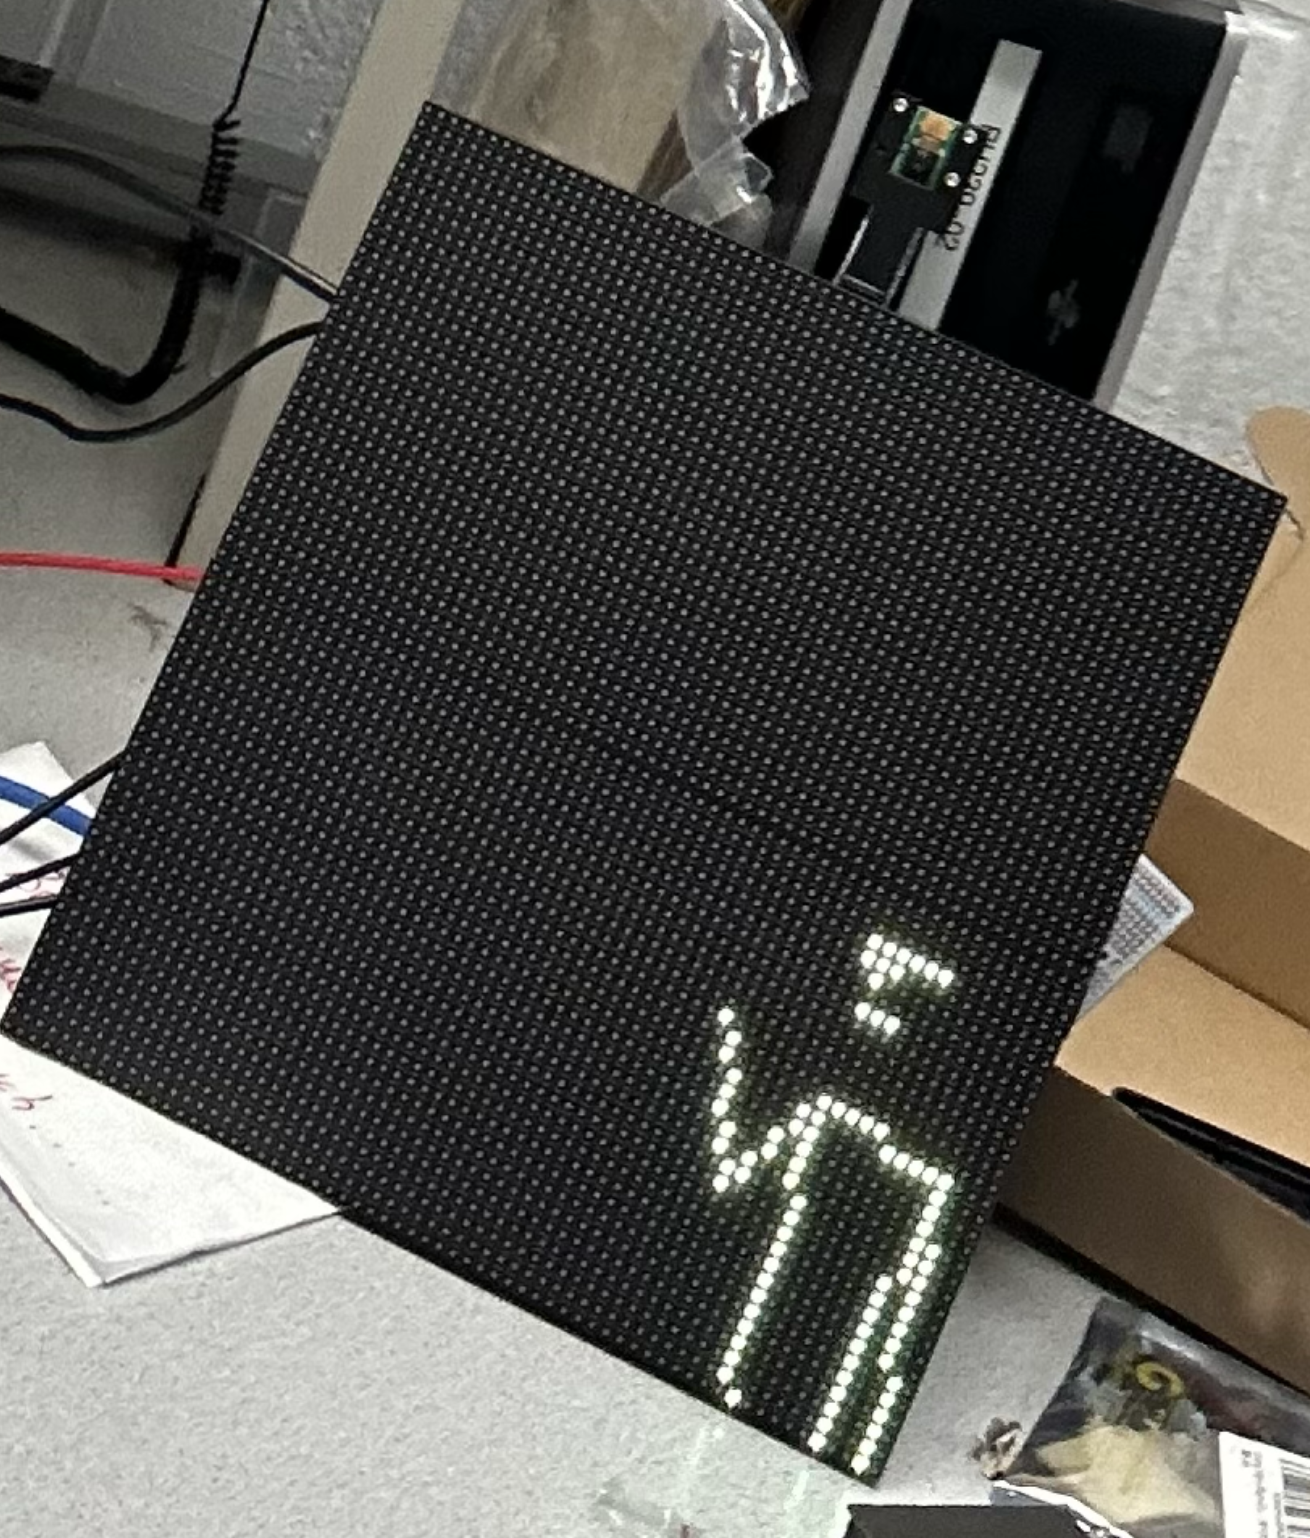
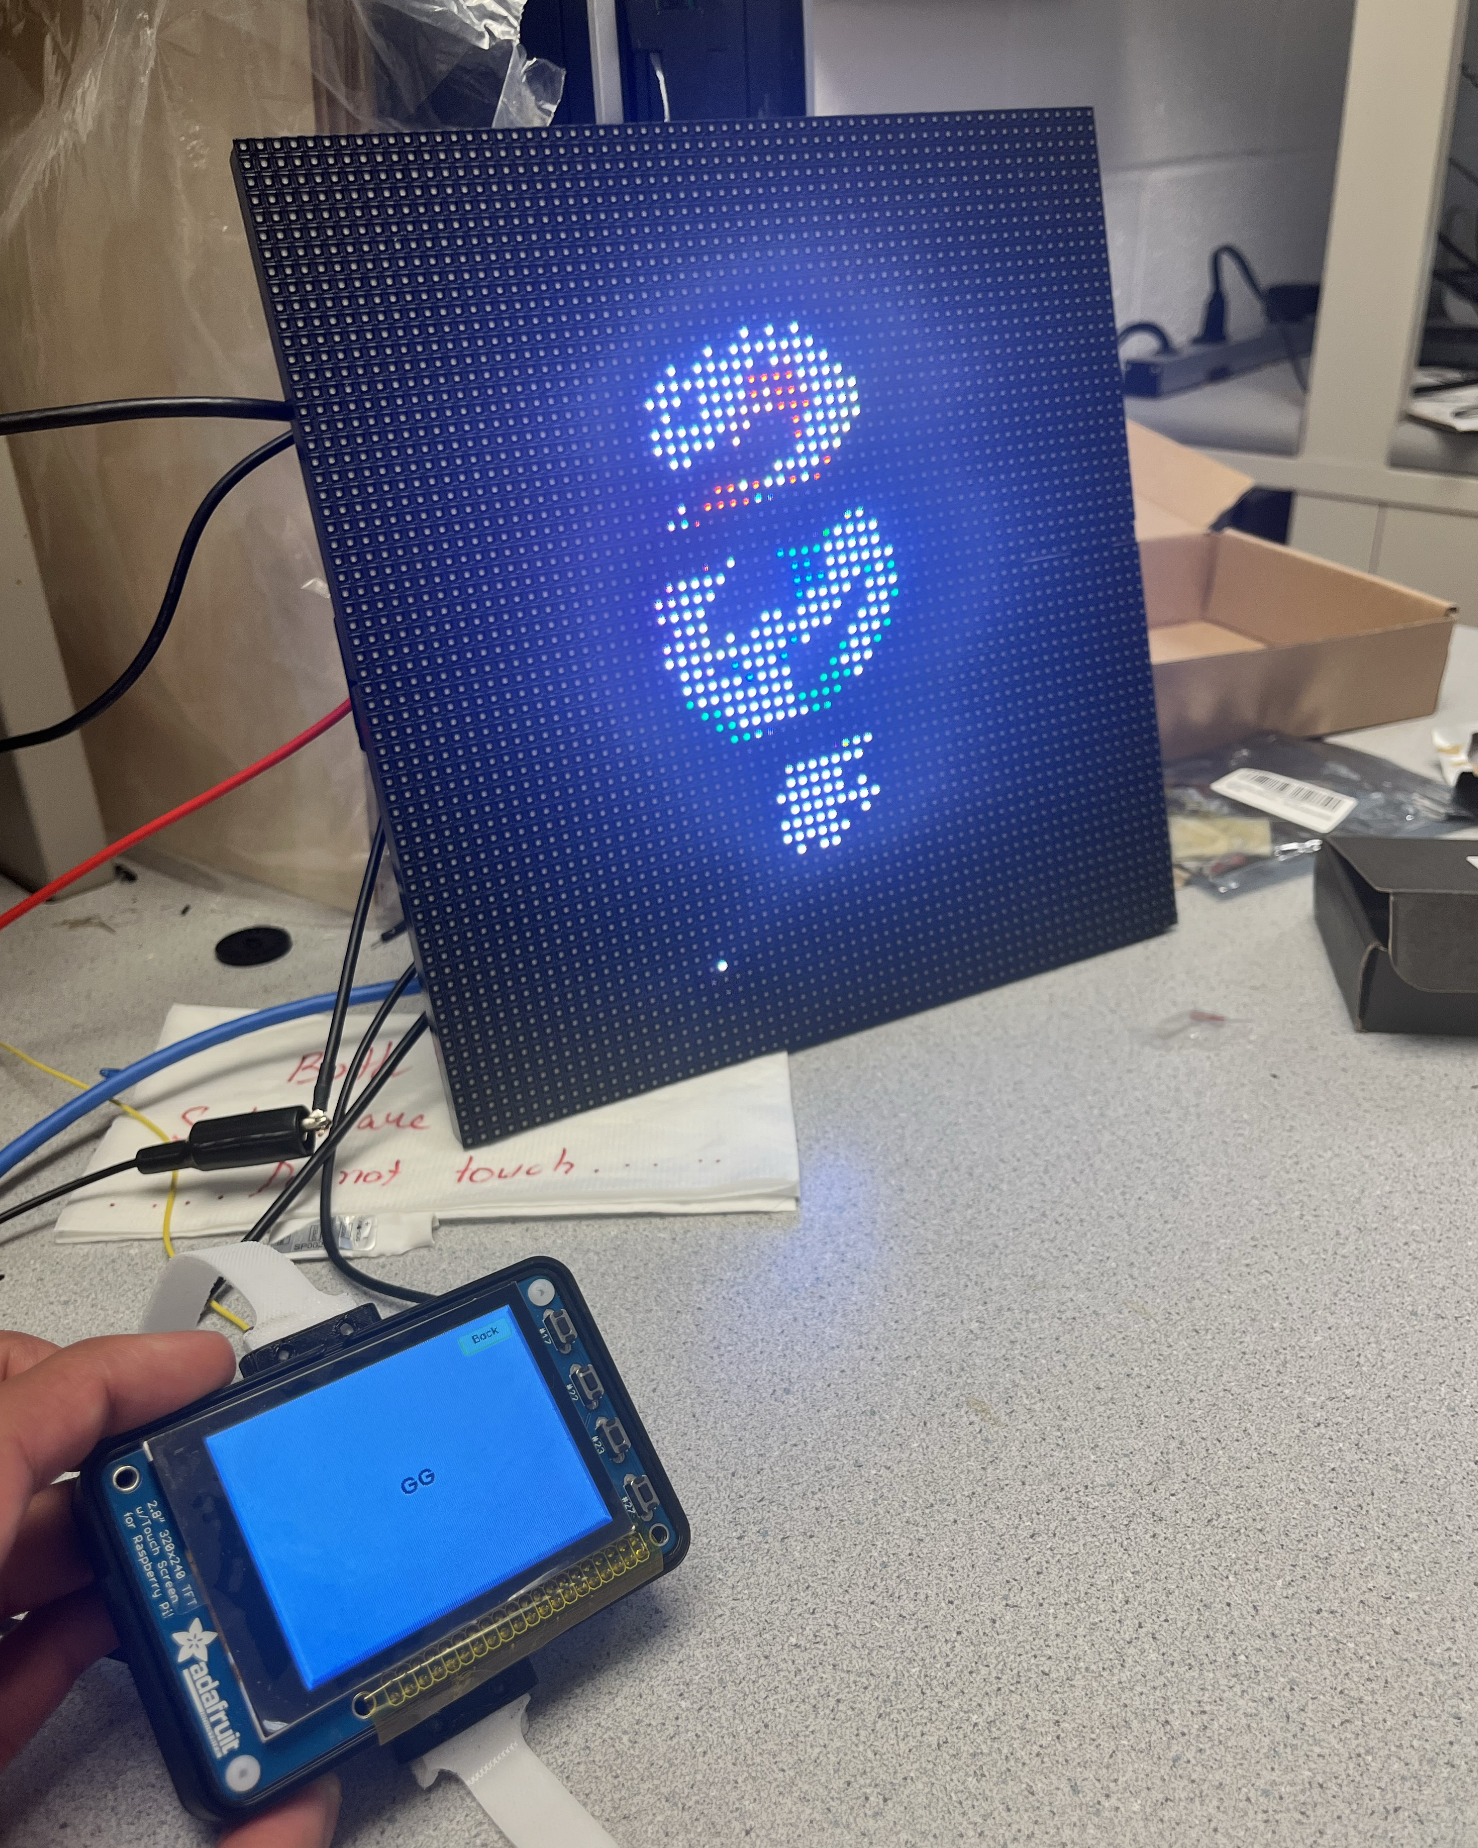
- Mirror Mode: In Mirror Mode, users can interact with our LED display, which offers a variety of user segmentation backgrounds captured by our camera. Users have the option to choose from a range of predefined backgrounds, and their image is displayed on the LED screen. This mode includes several features: a stick figure mode, a disco segmentation mode, and a standard segmentation mode.
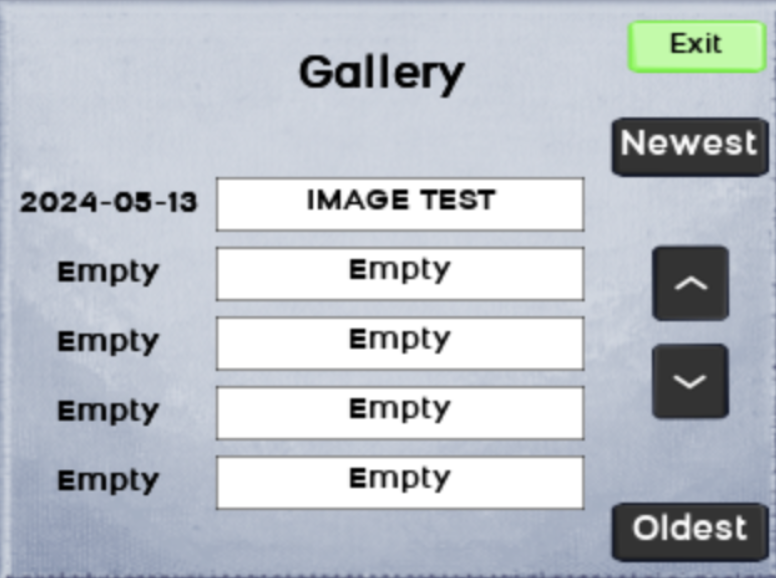
- Gallery Mode: In Gallery Mode, users can view and showcase their saved creations from Art Mode. This mode organizes artwork into a digital gallery where each drawing is displayed with a title and the date it was created. Users can navigate through the gallery using intuitive controls to scroll through the artworks, and they have options to view the newest or oldest entries with just a click. This mode not only serves as a repository for artistic output but also enhances user interaction by allowing them to revisit and appreciate their creative journey over time.
Testing
The front-end development testing focused primarily on ensuring usability on the piTFT's compact display. This involved adjusting the button sizes to ensure they were large enough to facilitate easy interaction for users. Additional testing was performed on the save functionality to confirm that names were correctly written to and retrieved from the JSON file. We also rigorously tested the gallery display to ensure that artworks were correctly ordered and displayed, enhancing the user experience by ensuring reliability and ease of access to saved drawings.
Issues
In developing the front-end display, we faced several challenges, notably with getting Pygame to render correctly on the piTFT screen. The primary issue stemmed from our initial use of HEX color values for font colors, which the piTFT could not process effectively, requiring a switch to RGB color values.
Art Mode
Mirror Mode
Gallery Mode
Display & Back End Processing
Design
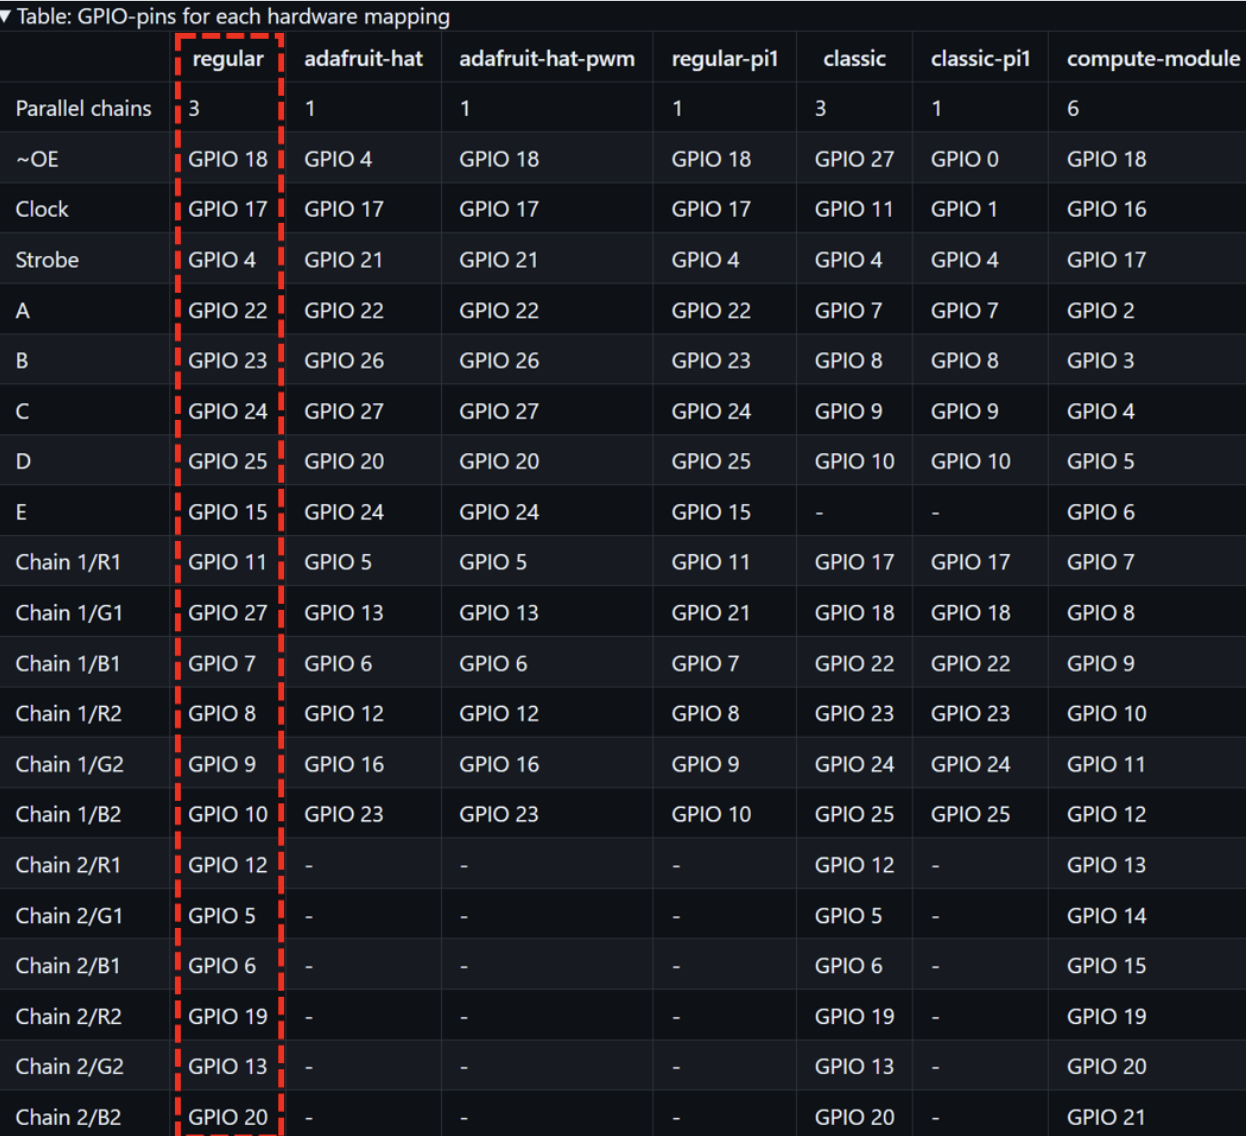
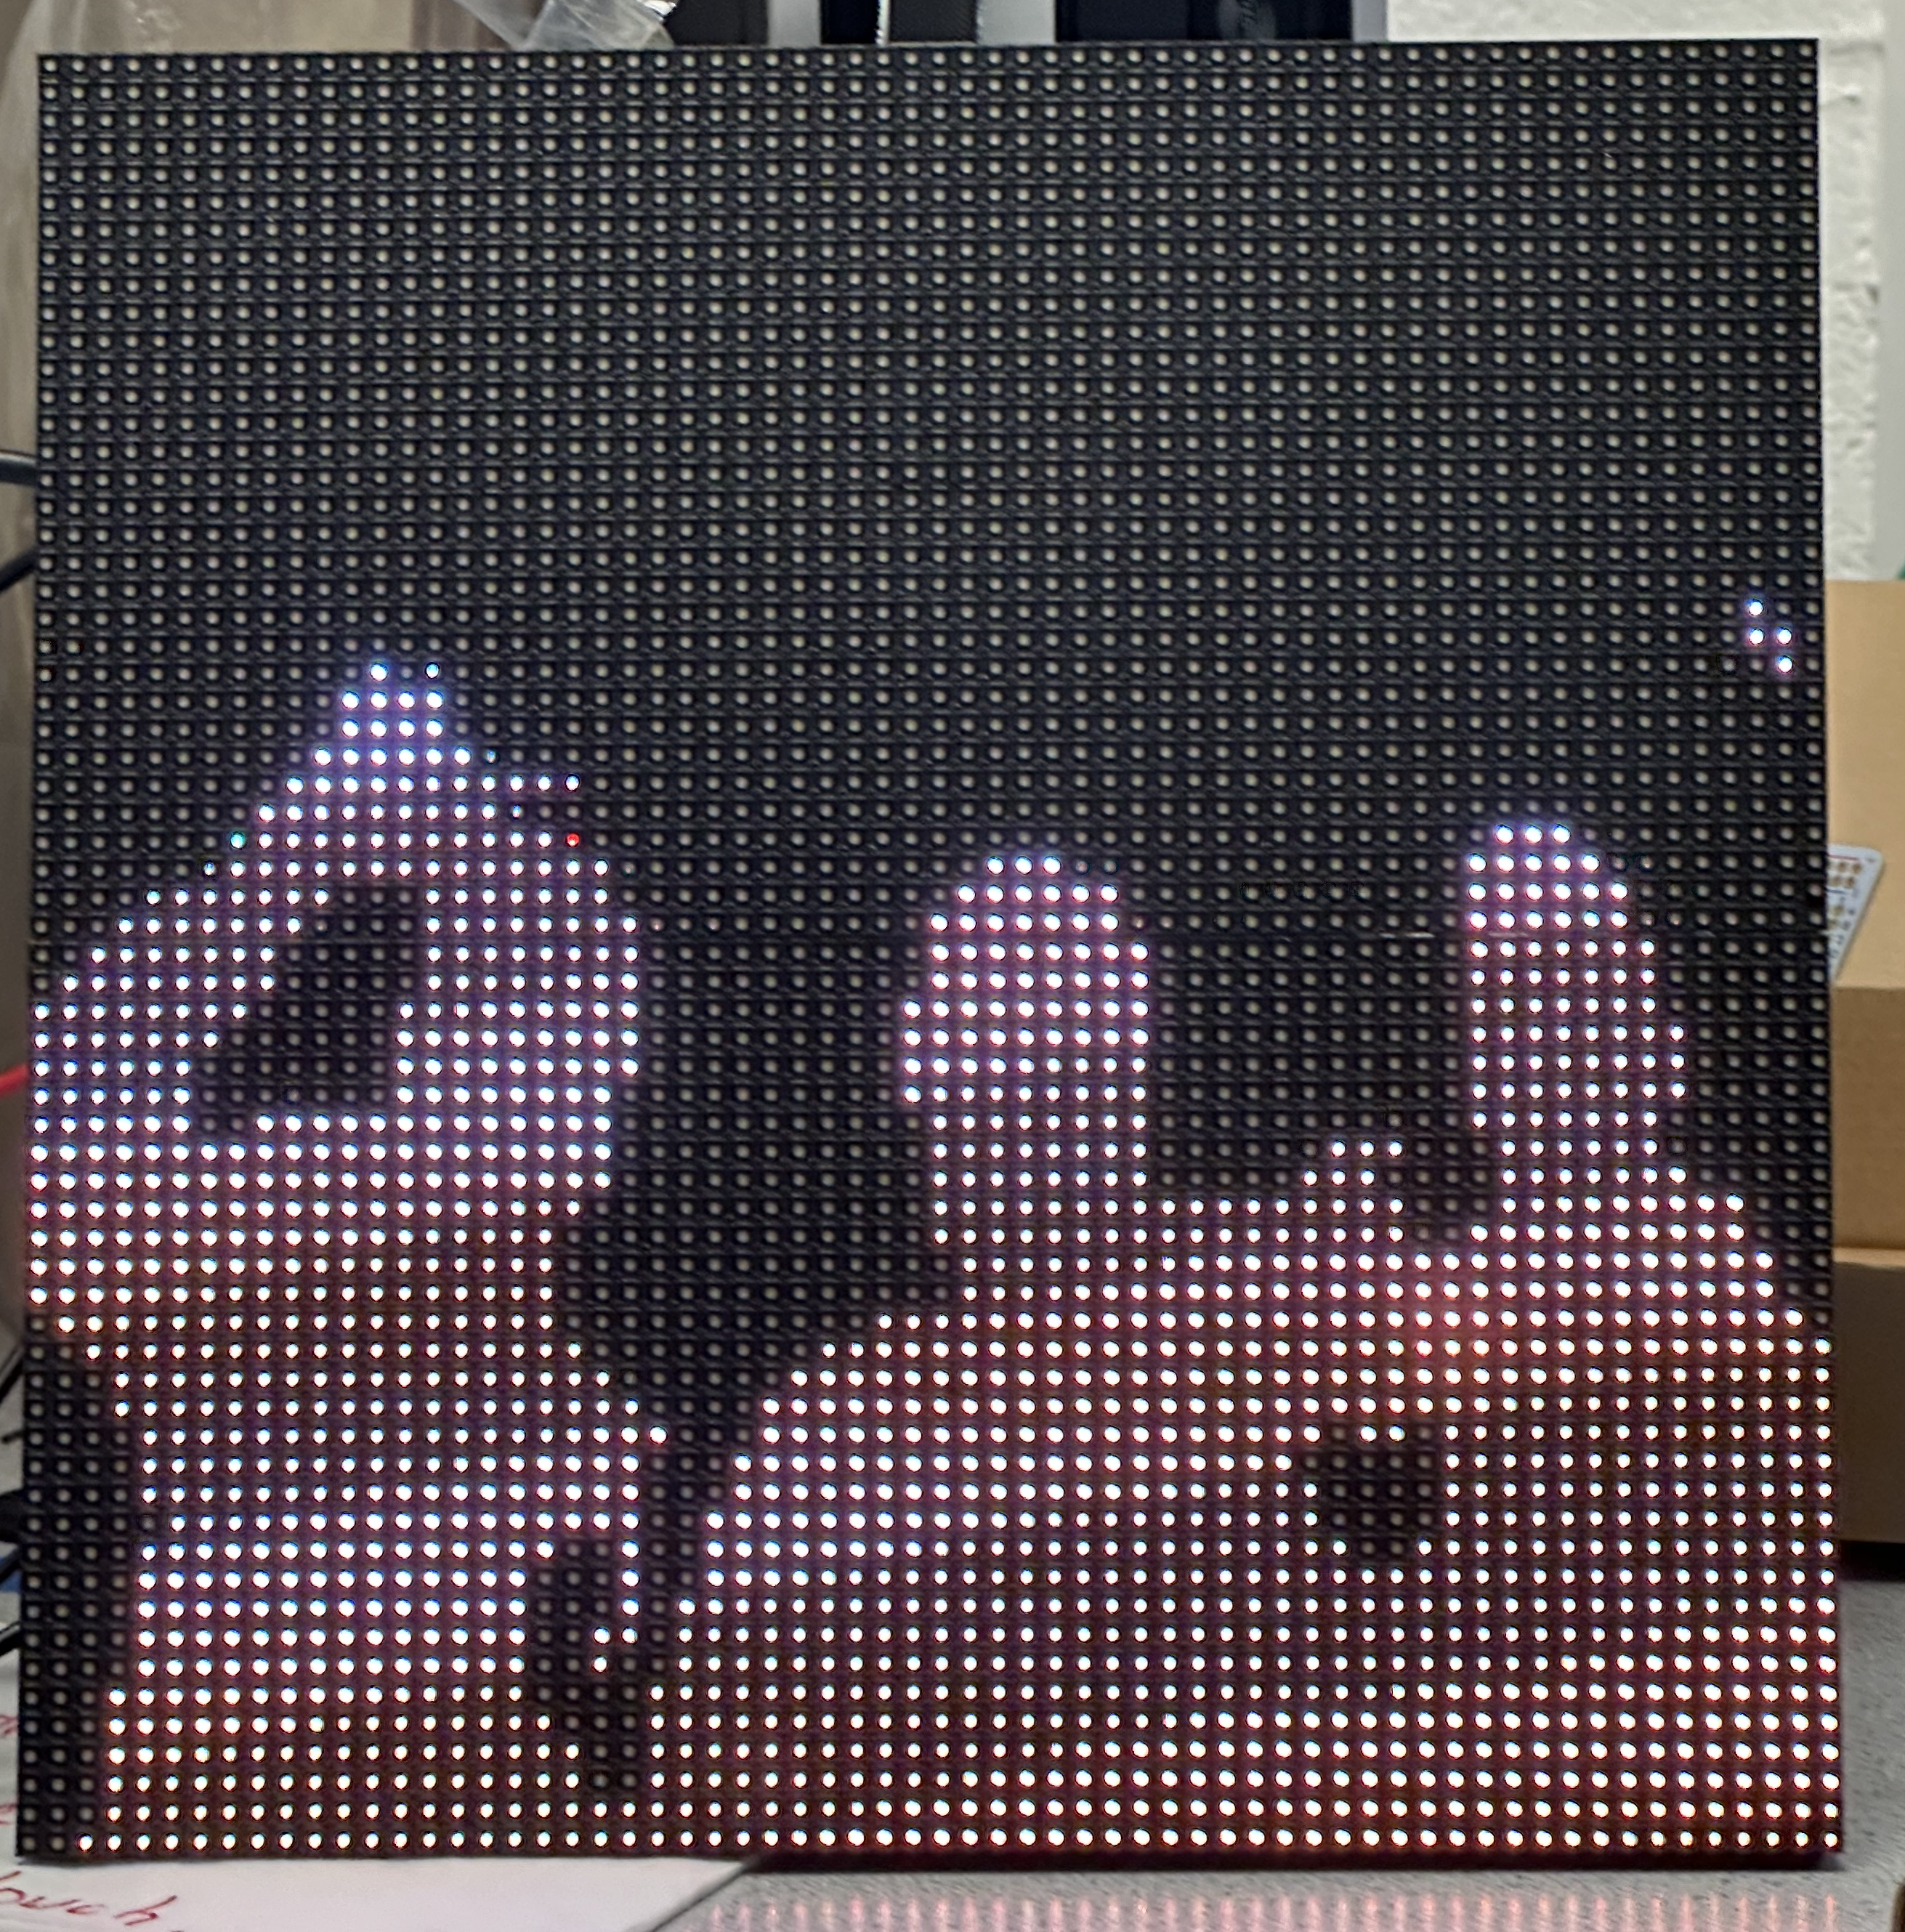
RBG LED MatrixThe RGB LED matrix design involved wiring two 32x64 RGB matrices in a parallel chain to a Raspberry Pi, creating a 64x64 square panel for a better viewing experience. Parallel wiring was chosen over daisy-chaining to achieve a higher refresh rate and ease of displaying images. Although daisy-chaining would require splitting the image, vertical splitter mode in the rpi-rgb-led-matrix library by hzeller could facilitate this. However, parallel wiring offered a simpler solution with up to three parallel chains.
 MediaPipe
For the image processing, we used mediapipe library to have four modes- Mirror mode, Stick mode, Disco mode, and the Art mode. The Mirror Mode used the selfie segmentation model from the Mediapipe library, performing well for solo individuals with minimal latency but struggling with multiple people or close-up shots. Disco Mode employed the same mask as Mirror Mode, looping through rainbow colors for each frame. Stick Mode used the pose landmarks model to track 33 connections, showing poses on the screen with some latency. Art Mode leveraged the hand landmarks model to track the index tip for drawing, improving drawing smoothness by increasing the brush size, drawing every third frame, and reducing the resolution to 320x240 for faster processing. Additional features included an eraser, image saving, and color changes via the piTFT attached to the wrist.
Issues
The RGB LED matrix faced a flickering issue with one panel after wiring, while the other worked fine. Swapping the problematic panel with a known working one didn’t resolve the flickering. Various parameters from the library, such as led_pwm_bits and led_limit_refresh, were tested without success. The issue was finally resolved by setting led_gpio_slowdown to 5, even though the documentation recommended a maximum of 4. Installing Mediapipe on the Raspberry Pi also posed challenges due to a lack of clear OS version requirements. The initial attempt on Bullseye 32-bit OS required Bazel, which was unavailable for 32-bit, necessitating an upgrade to 64-bit. However, the installation only worked on Ubuntu, making the upgrade futile. Following a professor’s suggestion, a guide from previous projects, Gesture Home and Air Painter, was used, which worked on Buster 32-bit OS. Although this older library had slower models, it was functional.
Testing
Testing the RGB LED matrix involved resolving the flickering issue by adjusting the led_gpio_slowdown parameter, after which the matrices displayed images without issues. Future improvements could include using a PCB adapter (design provided in the hzeller github repository) to simplify the wiring process. Testing Mediapipe models included verifying Mirror Mode for latency and performance with single and multiple individuals, checking Disco Mode for the color change effect in each frame, and assessing Stick Mode for pose tracking accuracy and response time. Art Mode was tested for drawing smoothness, brush size, frame rate adjustments, erasing, image saving, and color changes with the piTFT. The process highlighted the importance of compatible hardware, software, and thorough testing to address unexpected issues.
Art/Drawing Mode

Mirror (stickman/pose) Mode
Gallery Mode
Back End Communication & Code Execution
Design
We approached communication between the Pi 0 and the RPi 4 using Python sockets. We utilized two ports, 5000 and 5001, to send messages from the Pi 0 to the RPi 4.
Port 5000 was dedicated to executing code scripts. These messages were used to run Mirror Mode, Draw Mode, or Gallery Mode. Once the Pi 0 sent the command, the receiver script, in the RPi 4, parsed it and executed the appropriate script file using the subprocess library and sudo -E command. Additionally, the receiver script tracked the running process and terminated it when switching modes.
Port 5001 handled all information related to selecting colors or naming the canvas when saving. This port was created and listened to by the drawing script, ensuring that all messages were directed to it. This also created a separation between the port that should only be listened to by the execution file, and the one that should only be listened to by the drawing file.
Issues
The main issue we faced was terminating the running script when executing a new script command in order to switch modes. Initially, we tried to terminate the last running Python3 process by parsing all the running processes. However, this caused problems when we implemented the drawing functionality, as each new socket created a new Python process.
In order to solve this, we created a function in the main receiver script that tracked the last executed process using a variable. This function then terminated the previous process, by getting the PID from that variable, before switching to a new mode.
Testing
Testing was conducted in two stages: using an external laptop and the PiTFT.
First, we tested with an external laptop by connecting to the appropriate port to ensure the commands were being correctly parsed and executed. This approach saved us time, as we didn't need to repeatedly boot up the PiTFT and search for error messages.
Once we confirmed that everything worked correctly on the laptop, we moved on to testing with the PiTFT. For this stage, we clicked the screen buttons to verify that the code executed correctly.
Mechanical Components
Design
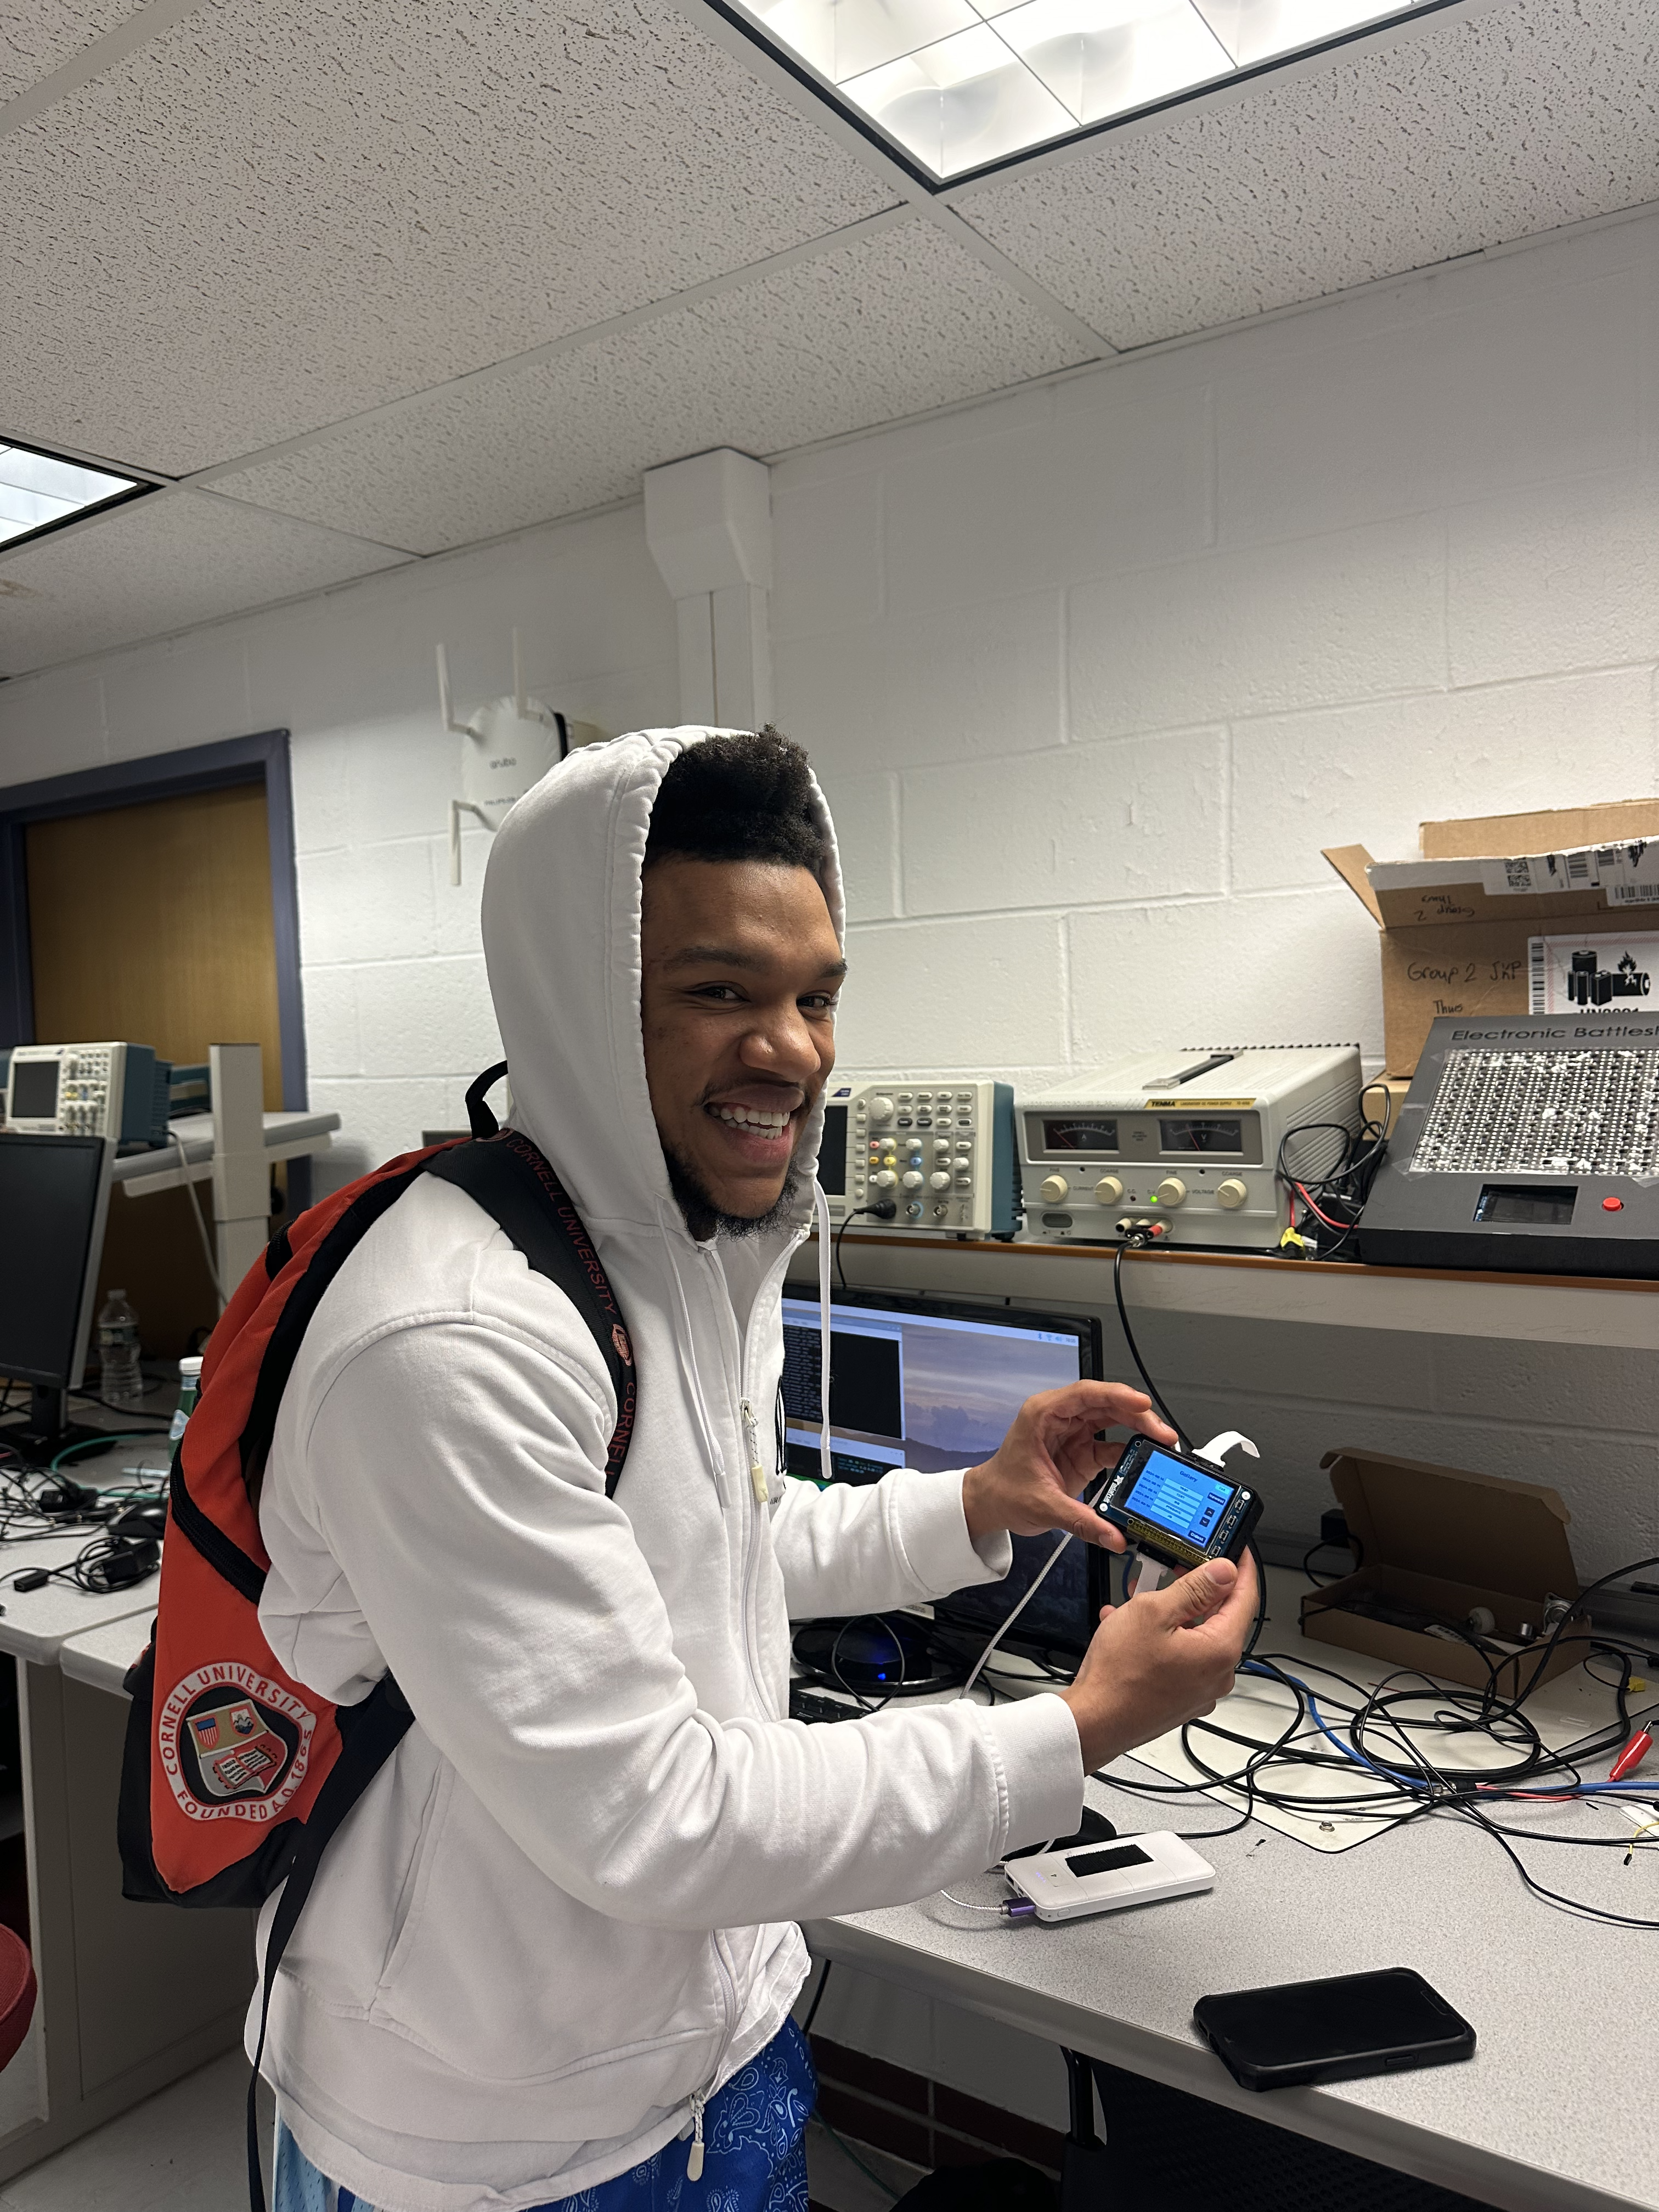
For our project, we aimed to ensure that the user had access to their hands, as our project heavily relies on hand gestures and requires interaction with the PiTFT screen. To achieve this, we designed a wristwatch compartment for the PiTFT and Raspberry Pi Zero, allowing the PiTFT interface to be worn on the user’s wrist.The Raspberry Pi Zero is connected to an external power supply that can be conveniently carried in the user’s pocket. The wristwatch compartment is secured to the user’s wrist using a Velcro strap.
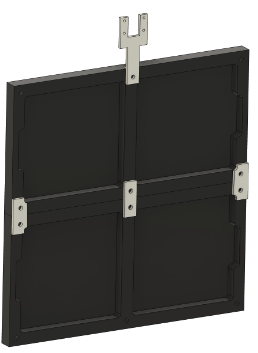
To provide a larger interactive canvas for the user, we connected two LED matrices. We achieved this by 3D printing small adapters that attached to the back of each LED display, enabling us to chain them together. Additionally, we designed a mount to conveniently position our camera at the top of the LED matrix.
Testing
We aimed to ensure that the wrist strap securely fit wrists of various sizes and that the Velcro strap could withstand the weight of the PiTFT and Raspberry Pi Zero. To verify this, we tested the longevity and comfort of wearing the wristwatch in different orientations.
Issues
The main problem was obtaining accurate measurements of the holes on the display, which lead to having to reprint the mounts.
PiTFT watch
Mounting Brackets
Results
Overall, we were able to successfully implement and demonstrate all the planned features of our VisionMatrix project. The Mirror Mode, Stick Mode, and the additional Disco Mode operated smoothly, providing an engaging user experience. The Art Mode, after optimization of Mediapipe model parameters and adjustments to server communication to ensure seamless color switching, functioned exceptionally well.
During our testing phase, we observed that the performance of the different modes was consistent and responsive. The LED matrices displayed the visual effects and user drawings without noticeable lag. Analyzing the system performance using htop revealed a balanced usage of all four cores of the Raspberry Pi, indicating efficient handling of machine learning and image processing tasks.
In Mirror Mode, the real-time segmentation and background replacement were effective, with minimal latency, allowing for an immersive experience. Stick Mode accurately tracked and displayed user poses, while Disco Mode added a dynamic and colorful element to the user’s silhouette. Art Mode’s drawing and color selection features were user-friendly and intuitive, and the gallery retrieval system worked as intended, making saved artworks easily accessible.
The design of the wristwatch compartment for the piTFT and Raspberry Pi Zero proved to be practical and comfortable, allowing users to interact with the interface easily. The secure fit of the wrist strap, as well as the stability of the attached components, ensured a reliable user experience. Additionally, the parallel wiring of the RGB LED matrices provided a high refresh rate and a seamless visual display.
Conclusion
In conclusion, we successfully created an interactive art installation that allows users to draw on the LED matrix using gesture-based inputs. In Art Mode, users can select their drawing color and create artwork on the display, with the option to save their creations. In Mirror Mode, users can mirror their movements using up to three different effects: mirror/hologram, disco, or stick man. Finally, saved images can be retrieved and displayed on the RGB matrix in Gallery Mode. Overall, this was a successful and enjoyable project!
Future Work
Some future work that would tie back well to this project are the following:
- Enhanced Gesture Recognition: We aim to support more complex gesture interactions, including pause drawing, undo/redo, and clear canvas gestures.
- Automatic Suggestions: To ensure optimal conditions for Vision Matrix, the display can provide suggestions if the room is too dark or if the person is too far from the camera.
- Expanded Art Modes: We plan to integrate different brush sizes and shapes to offer more drawing options.
- Better Saving and Sharing Options: We will enable cloud storage for safe and easy sharing of drawings and integrate APIs to post drawings on social media platforms.
- Interactive Demonstrations/Gamification: We will develop interactive tutorials and
games to help new users understand how Vision Matrix tracks and processes camera data.
- For beginners, tutorials will cover basic drawing techniques.
- For advanced users, we can gamify Vision Matrix, such as creating a drawing game where users attempt to draw a "perfect" circle or square, with a leaderboard to track the best attempts.
Parts
- Raspberry Pi 4B
- Raspberry Pi Zero 2W
- 2x SD cards
- 2x (64x32 RGB LED Matrix-4mm pitch)
- PiTFT
- 3 Power Supplies:
- Power bank for Raspberry Pi Zero 2W
- 5V 2A DC power adapter for Raspberry Pi 4
- 5V DC power supply for the LED matrices
- piCamera
References
- Mediapipe installation guides
- https://pypi.org/project/mediapipe-rpi4/
- https://core-electronics.com.au/guides/hand-identification-raspberry-pi/
- https://ai.google.dev/edge/mediapipe/framework/getting_started/install
- RGB LED matrix
- https://github.com/hzeller/rpi-rgb-led-matrix
- https://github.com/hzeller/rpi-rgb-led-matrix/tree/master
- https://www.youtube.com/watch?v=xSwoM3M24W8
- Socket Python
Code Appendix
        import cv2
        import mediapipe as mp
        from rgbmatrix import RGBMatrix, RGBMatrixOptions
        from PIL import Image, ImageDraw
        from gesture_recognizer import is_fist
        import socket
        import time

        print("running")

        # Setup socket for receiving color change messages
        local_ip = ""
        port = 5001

        receiver_socket = socket.socket()
        receiver_socket.setsockopt(socket.SOL_SOCKET, socket.SO_REUSEADDR, 1)
        receiver_socket.bind((local_ip, port))

        receiver_socket.listen()
        sender_socket, sender_address = receiver_socket.accept()
        print("Connection established with: ", sender_address)

        # Set up video capture
        video_object = cv2.VideoCapture(0)
        if not video_object.isOpened():
            print("Error opening video stream or file")

        # Initialize MediaPipe hands
        mp_hands = mp.solutions.hands

        # LED Matrix setup
        options = RGBMatrixOptions()
        options.rows = 32
        options.cols = 64
        options.chain_length = 1
        options.parallel = 2
        options.hardware_mapping = 'regular'
        options.gpio_slowdown = 5
        matrix = RGBMatrix(options=options)

        # Initialize an image for persistent drawing
        persistent_image = Image.new("RGB", (64, 64))
        draw_persistent = ImageDraw.Draw(persistent_image)

        # Define brush size (radius)
        brush_size = 1

        # FrameDrop
        frame_count = 0
        process_frame_interval = 3  # Process every 3rd frame

        # State variables
        drawing = True  # Attempt to pause the drawing

        # Non-blocking socket read
        sender_socket.setblocking(0)
        received_message = "black"

        # Use MediaPipe Hands within a 'with' block
        with mp_hands.Hands(min_detection_confidence=0.5, min_tracking_confidence=0.5, max_num_hands=1) as hands:
            while video_object.isOpened():
                try:
                    received_data = sender_socket.recv(1024)
                    received_message = received_data.decode().strip()
                    print(received_message)
                except BlockingIOError:
                    pass

                ret, frame = video_object.read()
                if not ret:
                    print("Ignoring empty camera frame.")
                    continue

                frame_count += 1
                if frame_count % process_frame_interval != 0:
                    continue

                # Flip the image horizontally for a laterally correct display, and convert the image to RGB
                frame = cv2.resize(cv2.flip(frame, 1), (320, 240))
                frame_rgb = cv2.cvtColor(frame, cv2.COLOR_BGR2RGB)
                results = hands.process(frame_rgb)

                # Copy the persistent image to the matrix image for displaying
                matrix_image = persistent_image.copy()
                draw = ImageDraw.Draw(matrix_image)

                possible_colors = ["red", "orange", "yellow", "green", "blue", "violet", "black", "white"]

                if received_message.startswith("at_name_"):
                    matrix_image.save(f"{received_message[8:]}.png")
                    time.sleep(2)
                    received_message = "black"

                if results.multi_hand_landmarks:
                    for hand_landmarks in results.multi_hand_landmarks:
                        # Check for gestures
                        if is_fist(hand_landmarks):
                            drawing = False
                        else:
                            drawing = True

                        if drawing:
                            # Highlight the index finger tip
                            index_tip = hand_landmarks.landmark[mp_hands.HandLandmark.INDEX_FINGER_TIP]
                            x_tip = int(index_tip.x * 64)
                            y_tip = int(index_tip.y * 64)

                            # Ensure received_message is a valid color
                            color = received_message if received_message in possible_colors else "black"

                            # Draw on the persistent image with specified color
                            draw_persistent.ellipse([(x_tip - brush_size, y_tip - brush_size), (x_tip + brush_size, y_tip + brush_size)], fill=color)

                            # Set crosshair color to white if drawing color is blue
                            crosshair_color = "white" if color == "blue" else "blue"
                            crosshair_size = 2
                            draw.line((x_tip - crosshair_size, y_tip, x_tip + crosshair_size, y_tip), fill=crosshair_color)
                            draw.line((x_tip, y_tip - crosshair_size, x_tip, y_tip + crosshair_size), fill=crosshair_color)

                # Update the matrix display with the updated matrix image
                matrix.SetImage(matrix_image.convert('RGB'))

                if cv2.waitKey(5) & 0xFF == 27:
                    break

        video_object.release()
        cv2.destroyAllWindows()
        matrix.Clear()
        import cv2
        import mediapipe as mp
        from rgbmatrix import RGBMatrix, RGBMatrixOptions
        from PIL import Image, ImageDraw

        # Initialize MediaPipe Selfie Segmentation
        mp_selfie_segmentation = mp.solutions.selfie_segmentation
        segmentation = mp_selfie_segmentation.SelfieSegmentation(model_selection=1)

        # Set up the video capture source
        video_object = cv2.VideoCapture(0)
        video_object.set(cv2.CAP_PROP_FRAME_WIDTH, 320)
        video_object.set(cv2.CAP_PROP_FRAME_HEIGHT, 240)

        # LED Matrix setup
        options = RGBMatrixOptions()
        options.rows = 32
        options.cols = 64
        options.chain_length = 1
        options.parallel = 2
        options.hardware_mapping = 'regular'
        options.gpio_slowdown = 5
        matrix = RGBMatrix(options=options)

        while video_object.isOpened():
            ret, frame = video_object.read()
            if not ret:
                print("Ignoring empty camera frame.")
                continue

            # To improve performance, optionally mark the image as not writeable to
            # pass by reference.
            frame.flags.writeable = False
            # Process frame with MediaPipe Segmentation
            results = segmentation.process(cv2.cvtColor(frame, cv2.COLOR_BGR2RGB))
            segmentation_mask = results.segmentation_mask

            # Threshold the mask to create a binary image
            _, binary_mask = cv2.threshold(segmentation_mask, 0.5, 255, cv2.THRESH_BINARY)

            # Convert the binary mask to a PIL image
            mask_image = Image.fromarray(binary_mask).convert('L')
            mask_image = mask_image.resize((64, 64), Image.NEAREST)

            # Convert to RGB mode before displaying
            rgb_image = mask_image.convert('RGB')

            # Display the result on the LED matrix
            matrix.SetImage(rgb_image)

            # Exit logic
            if cv2.waitKey(5) & 0xFF == 27:
                break


        video_object.release()
        matrix.Clear()
        import cv2
        import mediapipe as mp
        from rgbmatrix import RGBMatrix, RGBMatrixOptions
        from PIL import Image, ImageDraw

        # Initialize MediaPipe Pose and drawing utilities
        mp_pose = mp.solutions.pose
        mp_drawing = mp.solutions.drawing_utils

        # Set up the video capture source
        video_object = cv2.VideoCapture(0)
        video_object.set(cv2.CAP_PROP_FRAME_WIDTH, 320)
        video_object.set(cv2.CAP_PROP_FRAME_HEIGHT, 240)

        # LED Matrix setup
        options = RGBMatrixOptions()
        options.rows = 32
        options.cols = 64
        options.chain_length = 1
        options.parallel = 2
        options.hardware_mapping = 'regular'
        options.gpio_slowdown = 5
        matrix = RGBMatrix(options=options)

        #FrameDrop
        frame_count = 0
        process_frame_interval = 3  # Process every 2nd frame

        with mp_pose.Pose(static_image_mode=False,
                            min_detection_confidence=0.3,
                            min_tracking_confidence=0.5) as pose:

            while video_object.isOpened():
                ret, frame = video_object.read()
                if not ret:
                    print("Ignoring empty camera frame.")
                    continue

                frame_count += 1
                if frame_count % process_frame_interval != 0:
                    continue

                # To improve performance, optionally mark the image as not writeable to
                # pass by reference.
                frame.flags.writeable = False
                frame_rgb = cv2.cvtColor(frame, cv2.COLOR_BGR2RGB)
                results = pose.process(frame_rgb)

                # Create a blank image for the LED matrix
                matrix_image = Image.new("RGB", (64, 64))
                draw = ImageDraw.Draw(matrix_image)

                # Draw the pose annotations on the LED matrix image
                if results.pose_landmarks:
                    # Iterate through all connections
                    for connection in mp_pose.POSE_CONNECTIONS:
                        start_point = results.pose_landmarks.landmark[connection[0]]
                        end_point = results.pose_landmarks.landmark[connection[1]]
                        start_x, start_y = int(start_point.x * 64), int(start_point.y * 64)
                        end_x, end_y = int(end_point.x * 64), int(end_point.y * 64)
                        draw.line((start_x, start_y, end_x, end_y), fill="yellow", width=1)

                # Update the matrix display
                matrix.SetImage(matrix_image.convert('RGB'))

                # Exit logic
                if cv2.waitKey(5) & 0xFF == 27:
                    break

        video_object.release()
        cv2.destroyAllWindows()
        matrix.Clear()
        import cv2
        import mediapipe as mp
        from rgbmatrix import RGBMatrix, RGBMatrixOptions
        from PIL import Image, ImageDraw, ImageOps

        # Initialize MediaPipe Selfie Segmentation
        mp_selfie_segmentation = mp.solutions.selfie_segmentation
        segmentation = mp_selfie_segmentation.SelfieSegmentation(model_selection=1)

        # Set up the video capture source
        video_object = cv2.VideoCapture(0)
        video_object.set(cv2.CAP_PROP_FRAME_WIDTH, 320)
        video_object.set(cv2.CAP_PROP_FRAME_HEIGHT, 240)

        # LED Matrix setup
        options = RGBMatrixOptions()
        options.rows = 32
        options.cols = 64
        options.chain_length = 1
        options.parallel = 2
        options.hardware_mapping = 'regular'
        options.gpio_slowdown = 5
        matrix = RGBMatrix(options=options)

        # Define Mario Super Star colors
        super_star_colors = [
            (255, 0, 0),    # Red
            (255, 255, 0),  # Yellow
            (0, 0, 255),    # Blue
            (0, 255, 0)     # Green
        ]
        color_index = 0


        while video_object.isOpened():
            ret, frame = video_object.read()
            if not ret:
                print("Ignoring empty camera frame.")
                continue

            # Resize and process frame with MediaPipe Segmentation
            results = segmentation.process(cv2.cvtColor(frame, cv2.COLOR_BGR2RGB))
            segmentation_mask = results.segmentation_mask

            # Threshold the mask to create a binary image
            _, binary_mask = cv2.threshold(segmentation_mask, 0.5, 255, cv2.THRESH_BINARY)

            # Convert the binary mask to a PIL image
            mask_image = Image.fromarray(binary_mask).convert('L')
            mask_image = mask_image.resize((64, 64), Image.NEAREST)

            # Apply current rainbow color to the mask
            colored_mask = ImageOps.colorize(mask_image, black="black", white=super_star_colors[color_index])
            color_index = (color_index + 1) % len(super_star_colors)  # Update color index

            # Display the result on the LED matrix
            matrix.SetImage(colored_mask.convert('RGB'))

            # Exit logic
            if cv2.waitKey(5) & 0xFF == 27:
                break


        video_object.release()
        matrix.Clear()
        import cv2
        import mediapipe as mp
        from rgbmatrix import RGBMatrix, RGBMatrixOptions
        from PIL import Image, ImageDraw
        import sys
        import time
        #from receiver import received_message

        # LED Matrix setup
        options = RGBMatrixOptions()
        options.rows = 32
        options.cols = 64
        options.chain_length = 1
        options.parallel = 2
        options.hardware_mapping = 'regular'
        options.gpio_slowdown = 5
        matrix = RGBMatrix(options=options)

        image_path = str(sys.argv[1])+'.png'

        image = Image.open(image_path)

        #image = image.resize((64,64), Image.LANCZOS)

        matrix.SetImage(image.convert("RGB"))

        time.sleep(10)


        video_object.release()
        cv2.destroyAllWindows()
        matrix.Clear()
import pygame, pigame, sys
from buttons import Button
from pygame.locals import *
import datetime
import json
import os
import RPi.GPIO as GPIO
from time import sleep
import time
import socket
os.putenv('SDL_VIDEODRV', 'fbcon')
os.putenv('SDL_FBDEV', '/dev/fb0')
os.putenv('SDL_MOUSEDRV','dummy')
os.putenv('SDL_MOUSEDEV','/dev/null')
os.putenv('DISPLAY','')
receiver_ip = '10.49.88.187'
port = 5000
port_color = 5001
receiver_socket = socket.socket()
receiver_socket.connect((receiver_ip, port))
print("Connected to this IP: ", receiver_ip)
pygame.init()
pitft = pigame.PiTft()
screen = pygame.display.set_mode((320, 240))
BG = pygame.image.load("assets/background/background.png")
white = (255,255,255)
black= (0,0,0)
clock=pygame.time.Clock()
name_text = ""
window = None
save_data = {}
TimeOut=60
startTime = time.time()
pygame.mouse.set_visible(False)
GPIO.setmode(GPIO.BCM)
GPIO.setup(17, GPIO.IN, pull_up_down=GPIO.PUD_UP)
def button_17(channel):
print("Quit")
GPIO.cleanup()
sys.exit()
GPIO.add_event_detect(17, GPIO.FALLING, callback=button_17, bouncetime=300)
try:
with open('save_data.txt') as save_file:
save_data=json.load(save_file)
except:
print('No file created yet')
def get_font(size):
return pygame.font.Font("assets/fonts/bronovo.ttf", size)
def preview(title):
message = "gal_"+str(title)
#message = "gal_art2"
receiver_socket.send(message.encode())
while True:
pitft.update()
screen.blit(BG, (0,0))
SAVE_CONFIRM_MOUSE_POS = pygame.mouse.get_pos()
BACK_BUTTON = Button(image=pygame.image.load("assets/buttons/back.png"), pos=(282,20), text_input="Back", font=get_font(11), base_color=black)
PREVIEW_TITLE = Button(image=None, pos=(160,122), text_input=title, font=get_font(22), base_color=black)
#print(title)
for button in [BACK_BUTTON, PREVIEW_TITLE]:
button.update(screen)
for event in pygame.event.get():
#if event.type == pygame.QUIT:
# pygame.quit()
# sys.exit()
if event.type == pygame.MOUSEBUTTONDOWN:
if BACK_BUTTON.checkForInput(SAVE_CONFIRM_MOUSE_POS):
gallery()
pygame.display.update()
def gallery():
global save_data
sorted_data = sorted(save_data.items(), key=lambda item: item[1], reverse=True)
# Page setup
index = 0
items_per_page = 5
max_index = len(sorted_data) - items_per_page if len(sorted_data) > items_per_page else 0
while True:
pitft.update()
screen.blit(BG, (0,0))
GALLERY_MOUSE_POS = pygame.mouse.get_pos()
buttons = []
title_buttons = []
for i in range(items_per_page):
data_index = index + i
if data_index < len(sorted_data):
title, date = sorted_data[data_index]
else:
# If there are no more entries, display empty slots
title = "Empty"
date = "Empty"
date_button = Button(image=None, pos=(46, 85.5 + 28 * i), text_input=date, font=get_font(12), base_color=black)
title_button = Button(image=pygame.image.load("assets/text_boxes/gallery.png"), pos=(163, 84.5 + 28 * i), text_input=title, font=get_font(12), base_color=black)
buttons.extend([date_button, title_button])
title_buttons.append(title_button)
# Navigation buttons
BACK_BUTTON = Button(image=pygame.image.load("assets/buttons/back.png"), pos=(282,20), text_input="Exit", font=get_font(11), base_color=black)
UP_BUTTON = Button(image=pygame.image.load("assets/buttons/up.png"), pos=(279.5, 115.5))
DOWN_BUTTON = Button(image=pygame.image.load("assets/buttons/down.png"), pos=(279.5,155.5))
NEWEST_BUTTON = Button(image=pygame.image.load("assets/buttons/skip.png"), pos=(279, 61.5), text_input="Newest", font=get_font(14), base_color=white)
OLDEST_BUTTON = Button(image=pygame.image.load("assets/buttons/skip.png"), pos=(279,216.5), text_input="Oldest", font=get_font(14), base_color=white)
GALLERY = Button(image=None, pos=(156, 33), text_input= "Gallery", font=get_font(18), base_color=black)
buttons.extend([BACK_BUTTON, UP_BUTTON, DOWN_BUTTON, NEWEST_BUTTON, OLDEST_BUTTON, GALLERY])
for button in buttons:
button.update(screen)
for event in pygame.event.get():
#if event.type == pygame.QUIT:
# pygame.quit()
# sys.exit()
if event.type == pygame.MOUSEBUTTONDOWN:
if BACK_BUTTON.checkForInput(GALLERY_MOUSE_POS):
print("Main_Menu")
main_menu()
elif UP_BUTTON.checkForInput(GALLERY_MOUSE_POS) and index > 0:
index -= 1
elif DOWN_BUTTON.checkForInput(GALLERY_MOUSE_POS) and index < max_index:
index += 1
elif NEWEST_BUTTON.checkForInput(GALLERY_MOUSE_POS):
index = 0
elif OLDEST_BUTTON.checkForInput(GALLERY_MOUSE_POS):
index = max_index
else:
for button in title_buttons:
if button.checkForInput(GALLERY_MOUSE_POS):
preview(button.text_input)
print("this is the gallery image")
print(button.text_input)
pygame.display.update()
def name():
global name_text, window
window = "name"
text_box_rect = pygame.Rect(50, 50, 220, 30)
def handle_button_input(input_text):
global name_text
if input_text == "DEL":
name_text = name_text[:-1] # Remove the last character
elif input_text == "SPACE":
name_text += " " # Add space
elif input_text == "ENTER":
save(name_text) # Use the text to show user name
name_text = "" # Reset text after showing name
else:
if len(name_text) < 18:
name_text += input_text
while True:
pitft.update()
time_delta = clock.tick(60)/1000.0
screen.blit(BG, (0, 0))
NAME_MOUSE_POS = pygame.mouse.get_pos()
Q_BUTTON = Button(image=pygame.image.load("assets/text_boxes/key_text.png"), pos=(34.5, 110.5), text_input="Q", font=get_font(17), base_color=white)
W_BUTTON = Button(image=pygame.image.load("assets/text_boxes/key_text.png"), pos=(61.5, 110.5), text_input="W", font=get_font(17), base_color=white)
E_BUTTON = Button(image=pygame.image.load("assets/text_boxes/key_text.png"), pos=(88.5, 110.5), text_input="E", font=get_font(17), base_color=white)
R_BUTTON = Button(image=pygame.image.load("assets/text_boxes/key_text.png"), pos=(115.5, 110.5), text_input="R", font=get_font(17), base_color=white)
T_BUTTON = Button(image=pygame.image.load("assets/text_boxes/key_text.png"), pos=(142.5, 110.5), text_input="T", font=get_font(17), base_color=white)
Y_BUTTON = Button(image=pygame.image.load("assets/text_boxes/key_text.png"), pos=(169.5, 110.5), text_input="Y", font=get_font(17), base_color=white)
U_BUTTON = Button(image=pygame.image.load("assets/text_boxes/key_text.png"), pos=(196.5, 110.5), text_input="U", font=get_font(17), base_color=white)
I_BUTTON = Button(image=pygame.image.load("assets/text_boxes/key_text.png"), pos=(223.5, 110.5), text_input="I", font=get_font(17), base_color=white)
O_BUTTON = Button(image=pygame.image.load("assets/text_boxes/key_text.png"), pos=(250.5, 110.5), text_input="O", font=get_font(17), base_color=white)
P_BUTTON = Button(image=pygame.image.load("assets/text_boxes/key_text.png"), pos=(277.5, 110.5), text_input="P", font=get_font(17), base_color=white)
A_BUTTON = Button(image=pygame.image.load("assets/text_boxes/key_text.png"), pos=(48.5, 144.5), text_input="A", font=get_font(17), base_color=white)
S_BUTTON = Button(image=pygame.image.load("assets/text_boxes/key_text.png"), pos=(75.5, 144.5), text_input="S", font=get_font(17), base_color=white)
D_BUTTON = Button(image=pygame.image.load("assets/text_boxes/key_text.png"), pos=(102.5, 144.5), text_input="D", font=get_font(17), base_color=white)
F_BUTTON = Button(image=pygame.image.load("assets/text_boxes/key_text.png"), pos=(129.5, 144.5), text_input="F", font=get_font(17), base_color=white)
G_BUTTON = Button(image=pygame.image.load("assets/text_boxes/key_text.png"), pos=(156.5, 144.5), text_input="G", font=get_font(17), base_color=white)
H_BUTTON = Button(image=pygame.image.load("assets/text_boxes/key_text.png"), pos=(183.5, 144.5), text_input="H", font=get_font(17), base_color=white)
J_BUTTON = Button(image=pygame.image.load("assets/text_boxes/key_text.png"), pos=(210.5, 144.5), text_input="J", font=get_font(17), base_color=white)
K_BUTTON = Button(image=pygame.image.load("assets/text_boxes/key_text.png"), pos=(237.5, 144.5), text_input="K", font=get_font(17), base_color=white)
L_BUTTON = Button(image=pygame.image.load("assets/text_boxes/key_text.png"), pos=(264.5, 144.5), text_input="L", font=get_font(17), base_color=white)
Z_BUTTON = Button(image=pygame.image.load("assets/text_boxes/key_text.png"), pos=(76.5, 179.5), text_input="Z", font=get_font(17), base_color=white)
X_BUTTON = Button(image=pygame.image.load("assets/text_boxes/key_text.png"), pos=(103.5, 179.5), text_input="X", font=get_font(17), base_color=white)
C_BUTTON = Button(image=pygame.image.load("assets/text_boxes/key_text.png"), pos=(130.5, 179.5), text_input="C", font=get_font(17), base_color=white)
V_BUTTON = Button(image=pygame.image.load("assets/text_boxes/key_text.png"), pos=(157.5, 179.5), text_input="V", font=get_font(17), base_color=white)
B_BUTTON = Button(image=pygame.image.load("assets/text_boxes/key_text.png"), pos=(184.5, 179.5), text_input="B", font=get_font(17), base_color=white)
N_BUTTON = Button(image=pygame.image.load("assets/text_boxes/key_text.png"), pos=(211.5, 179.5), text_input="N", font=get_font(17), base_color=white)
M_BUTTON = Button(image=pygame.image.load("assets/text_boxes/key_text.png"), pos=(238.5, 179.5), text_input="M", font=get_font(17), base_color=white)
SPACE_BUTTON = Button(image=pygame.image.load("assets/text_boxes/space_key.png"), pos=(154.5, 211.5), text_input="SPACE", font=get_font(19), base_color=white)
ENTER_BUTTON = Button(image=pygame.image.load("assets/text_boxes/enter_key.png"), pos=(266.5, 211.5), text_input="ENTER", font=get_font(17), base_color=white)
DEL_BUTTON = Button(image=pygame.image.load("assets/text_boxes/del_key.png"), pos=(279, 179.5), text_input="DEL", font=get_font(16), base_color=white)
NAME = Button(image=None, pos=(159.5,24), text_input="Name", font=get_font(16), base_color=black)
BACK_BUTTON = Button(image=pygame.image.load("assets/buttons/back.png"), pos=(282,20), text_input="Back", font=get_font(11), base_color=black)
button_list = [Q_BUTTON, W_BUTTON, E_BUTTON, R_BUTTON, T_BUTTON, Y_BUTTON, U_BUTTON, I_BUTTON, O_BUTTON,
P_BUTTON, A_BUTTON, S_BUTTON, D_BUTTON, F_BUTTON, G_BUTTON, H_BUTTON, J_BUTTON, K_BUTTON,
L_BUTTON, Z_BUTTON, X_BUTTON, C_BUTTON, V_BUTTON, B_BUTTON, N_BUTTON, M_BUTTON, SPACE_BUTTON,
DEL_BUTTON, ENTER_BUTTON]
button_list2 = [NAME, BACK_BUTTON]
for button in button_list:
button.update(screen)
for button in button_list2:
button.update(screen)
for event in pygame.event.get():
if event.type == pygame.QUIT:
pygame.quit()
sys.exit()
for button in button_list:
if event.type == pygame.MOUSEBUTTONDOWN:
if button.checkForInput(NAME_MOUSE_POS):
handle_button_input(button.text_input)
if event.type == pygame.MOUSEBUTTONDOWN:
if BACK_BUTTON.checkForInput(NAME_MOUSE_POS):
if len(name_text) == 0:
save(name_text)
else:
back_confirm()
text_surface = get_font(24).render(name_text, True, pygame.Color('black'))
screen.blit(text_surface, (text_box_rect.x + 5, text_box_rect.y + 5)) # Adjust text position inside the box
pygame.draw.rect(screen, pygame.Color('white'), text_box_rect, 2)
pygame.display.update()
def back_confirm():
global window, name_text
while True:
pitft.update()
screen.blit(BG, (0,0))
SAVE_CONFIRM_MOUSE_POS = pygame.mouse.get_pos()
YES_BUTTON = Button(image=pygame.image.load("assets/buttons/yes.png"), pos=(103,140), text_input="Yes", font=get_font(14), base_color=black)
CANCEL_BUTTON = Button(image=pygame.image.load("assets/buttons/cancel.png"), pos=(215,140), text_input="Cancel", font=get_font(13), base_color=black)
TEXT = Button(image=None, pos=(160,86), text_input="Are you sure that you dont want to save?", font=get_font(14), base_color=black)
for button in [YES_BUTTON, CANCEL_BUTTON, TEXT]:
button.update(screen)
for event in pygame.event.get():
# if event.type == pygame.QUIT:
# pygame.quit()
# sys.exit()
if event.type == pygame.MOUSEBUTTONDOWN:
if YES_BUTTON.checkForInput(SAVE_CONFIRM_MOUSE_POS):
if window == "artmode":
#color_socket.close()
main_menu()
elif window == "save":
name_text=""
art_mode()
elif window == "name":
name_text=""
save(name_text)
if CANCEL_BUTTON.checkForInput(SAVE_CONFIRM_MOUSE_POS):
if window == "artmode":
art_mode()
if window == "save":
save(name_text)
if window == "name":
name()
pygame.display.update()
def save_confirm():
global window, name_text
current_date = datetime.datetime.now().date().strftime("%Y-%m-%d")
while True:
pitft.update()
screen.blit(BG, (0,0))
SAVE_CONFIRM_MOUSE_POS = pygame.mouse.get_pos()
YES_BUTTON = Button(image=pygame.image.load("assets/buttons/yes.png"), pos=(113,179), text_input="Yes", font=get_font(14), base_color=black)
CANCEL_BUTTON = Button(image=pygame.image.load("assets/buttons/cancel.png"), pos=(215,179), text_input="Cancel", font=get_font(13), base_color=black)
TEXT = Button(image=None, pos=(160,59), text_input="Confirm Save?", font=get_font(14), base_color=black)
NAME = Button(image=None, pos=(160.5,99), text_input=name_text, font=get_font(14), base_color=black)
DATE = Button(image=None, pos=(160.5,119), text_input=current_date, font=get_font(14), base_color=black)
for button in [YES_BUTTON, CANCEL_BUTTON, TEXT, NAME, DATE]:
button.update(screen)
for event in pygame.event.get():
# if event.type == pygame.QUIT:
# pygame.quit()
# sys.exit()
if event.type == pygame.MOUSEBUTTONDOWN:
if YES_BUTTON.checkForInput(SAVE_CONFIRM_MOUSE_POS):
save_data[name_text]=current_date
with open('save_data.txt','w') as save_file:
json.dump(save_data,save_file)
print(name_text)
message = "at_name_"+name_text
color_socket.send(message.encode())
name_text=""
#print(name_text)
gallery()
if CANCEL_BUTTON.checkForInput(SAVE_CONFIRM_MOUSE_POS):
save(name_text)
pygame.display.update()
def save(name_text):
global window
window = "save"
display_error = False
while True:
pitft.update()
screen.blit(BG, (0,0))
SAVE_MOUSE_POS = pygame.mouse.get_pos()
if display_error:
title_input = "Name is Required"
title_color = (255,0,0)
else:
title_input = name_text if name_text else ""
title_color = black
TITLE_BUTTON = Button(image=pygame.image.load("assets/text_boxes/save.png"), pos=(192,126), text_input=title_input, font=get_font(14), base_color=title_color)
DATE_BUTTON = Button(image=None, pos=(134,166), text_input=datetime.datetime.now().date().strftime("%Y-%m-%d"), font=get_font(14), base_color=black)
NAME = Button(image=None, pos=(52,126), text_input="Name:", font=get_font(14), base_color=black)
DATE = Button(image=None, pos=(55,166), text_input="Date:", font=get_font(15), base_color=black)
TEXT = Button(image=None, pos=(166,63), text_input="Save", font=get_font(16), base_color=black)
BACK_BUTTON = Button(image=pygame.image.load("assets/buttons/back.png"), pos=(282,20), text_input="Back", font=get_font(11), base_color=black)
SAVE_BUTTON = Button(image=pygame.image.load("assets/buttons/save.png"), pos=(260,185), text_input="Save", font=get_font(13), base_color=black)
for button in [TITLE_BUTTON, DATE_BUTTON, NAME, DATE_BUTTON, DATE, TEXT, BACK_BUTTON, SAVE_BUTTON]:
button.update(screen)
for event in pygame.event.get():
# if event.type == pygame.QUIT:
# pygame.quit()
# sys.exit()
if event.type == pygame.MOUSEBUTTONDOWN:
if BACK_BUTTON.checkForInput(SAVE_MOUSE_POS):
if len(name_text) == 0:
art_mode()
back_confirm()
if TITLE_BUTTON.checkForInput(SAVE_MOUSE_POS):
name()
if SAVE_BUTTON.checkForInput(SAVE_MOUSE_POS):
if len(name_text) == 0:
display_error = True
else:
display_error = False
save_confirm()
pygame.display.update()
def art_mode():
time.sleep(10)
global color_socket
color_socket = socket.socket()
color_socket.connect((receiver_ip, port_color))
print("Connected to color port: ", receiver_ip)
#now = time.time()
#elapsedTime = now - startTime
#if elapsedTime > TimeOut:
# pygame.quit()
# sys.exit()
global window
window = "artmode"
BACK_BUTTON = Button(image=pygame.image.load("assets/buttons/back.png"), pos=(282,20), text_input="Back", font=get_font(11), base_color=black)
SAVE_BUTTON = Button(image=pygame.image.load("assets/buttons/save.png"), pos=(260,185), text_input="Save", font=get_font(13), base_color=black)
TITLE = Button(image=None, pos=(42,13), text_input="Art Mode", font=get_font(12), base_color=black)
YELLOW = Button(image=pygame.image.load("assets/circles/yellow.png"), pos=(52,86))
YELLOW_CLICKED = Button(image=pygame.image.load("assets/circles/yellow_clicked.png"), pos=(52,86))
RED = Button(image=pygame.image.load("assets/circles/red.png"), pos=(145,33))
RED_CLICKED = Button(image=pygame.image.load("assets/circles/red_clicked.png"), pos=(145,33))
BLUE_CLICKED = Button(image=pygame.image.load("assets/circles/blue_clicked.png"), pos=(46,187))
BLUE = Button(image=pygame.image.load("assets/circles/blue.png"), pos=(46,187))
VIOLET_CLICKED = Button(image=pygame.image.load("assets/circles/violet_clicked.png"), pos=(96,210))
VIOLET = Button(image=pygame.image.load("assets/circles/violet.png"), pos=(96,210))
WHITE_CLICKED = Button(image=pygame.image.load("assets/circles/white_clicked.png"), pos=(152,197))
WHITE = Button(image=pygame.image.load("assets/circles/white.png"), pos=(152,197))
ORANGE_CLICKED = Button(image=pygame.image.load("assets/circles/orange_clicked.png"), pos=(94,53))
ORANGE = Button(image=pygame.image.load("assets/circles/orange.png"), pos=(94,53))
GREEN_CLICKED = Button(image=pygame.image.load("assets/circles/green_clicked.png"), pos=(34,136))
GREEN = Button(image=pygame.image.load("assets/circles/green.png"), pos=(34,136))
ERASE = Button(image=pygame.image.load("assets/buttons/erase.png"), pos=(256,98), text_input="Erase", font=get_font(15), base_color=black)
ERASE_CLICKED = Button(image=pygame.image.load("assets/buttons/erase_clicked.png"), pos=(256,98), text_input="Erase", font=get_font(15), base_color=(213,212,217))
button_on = ["ERASE"]
colors = {"YELLOW" : {"state": False, "clicked": YELLOW_CLICKED, "unclicked": YELLOW},
"RED" : {"state": False, "clicked": RED_CLICKED, "unclicked": RED},
"BLUE" : {"state": False, "clicked": BLUE_CLICKED, "unclicked": BLUE},
"VIOLET" : {"state": False, "clicked": VIOLET_CLICKED, "unclicked": VIOLET},
"WHITE" : {"state": False, "clicked": WHITE_CLICKED, "unclicked": WHITE},
"ORANGE" : {"state": False, "clicked": ORANGE_CLICKED, "unclicked": ORANGE},
"GREEN" : {"state": False, "clicked": GREEN_CLICKED, "unclicked": GREEN},
"BLACK": {"state": False, "clicked": ERASE_CLICKED, "unclicked": ERASE}}
def is_any_color_active():
return any(value['state'] for key, value in colors.items() if key != "ERASE")
def update_buttons(button_dict, screen):
for key, value in button_dict.items():
if value['state']:
value['clicked'].update(screen)
else:
value['unclicked'].update(screen)
def check_clicked(button_dict):
nonlocal button_on
for key, value in button_dict.items():
if value['unclicked'].checkForInput(ART_MOUSE_POS) or value['clicked'].checkForInput(ART_MOUSE_POS):
if button_on[0] != key:
if button_on[0] in button_dict:
button_dict[button_on[0]]['state'] = False
button_on[0] = key
value['state'] = not value['state']
message = str(key.lower())
print(message)
color_socket.send(message.encode())
while True:
pitft.update()
screen.blit(BG, (0, 0))
ART_MOUSE_POS = pygame.mouse.get_pos()
update_buttons(colors, screen)
for button in [BACK_BUTTON, SAVE_BUTTON, TITLE]:
button.update(screen)
for event in pygame.event.get():
if event.type == pygame.QUIT:
pygame.quit()
sys.exit()
elif event.type == pygame.MOUSEBUTTONDOWN:
check_clicked(colors)
if BACK_BUTTON.checkForInput(ART_MOUSE_POS):
if is_any_color_active():
back_confirm()
color_socket.close()
main_menu()
if SAVE_BUTTON.checkForInput(ART_MOUSE_POS):
save(name_text)
pygame.display.update()
def mirror_mode():
while True:
pitft.update()
screen.blit(BG, (0,0))
MIRROR_MODE_MOUSE_POS = pygame.mouse.get_pos()
BACKGROUND_1 = Button(image=pygame.image.load("assets/buttons/background.png"), pos=(161,66), text_input="Mirror", font=get_font(16), base_color=black)
BACKGROUND_2 = Button(image=pygame.image.load("assets/buttons/background.png"), pos=(161,131), text_input="Stick", font=get_font(16), base_color=black)
BACKGROUND_3 = Button (image=pygame.image.load("assets/buttons/background.png"), pos=(161,196), text_input="Disco", font=get_font(16), base_color=black)
BACK_BUTTON = Button(image=pygame.image.load("assets/buttons/back.png"), pos=(282,20), text_input="Back", font=get_font(11), base_color=black)
TITLE = Button(image=None, pos=(45,13), text_input="Mirror Mode", font=get_font(12), base_color=black)
for button in [BACKGROUND_1, BACKGROUND_2, BACKGROUND_3, BACK_BUTTON, TITLE]:
button.update(screen)
for event in pygame.event.get():
# if event.type == pygame.QUIT:
# pygame.quit()
# sys.exit()
if event.type == pygame.MOUSEBUTTONDOWN:
if BACKGROUND_1.checkForInput(MIRROR_MODE_MOUSE_POS):
print("BACKGROUND 1")
message = "seg"
receiver_socket.send(message.encode())
if BACKGROUND_2.checkForInput(MIRROR_MODE_MOUSE_POS):
print("BACKGROUND 2")
message = "pose"
receiver_socket.send(message.encode())
if BACKGROUND_3.checkForInput(MIRROR_MODE_MOUSE_POS):
print("BACKGROUND 3")
message = "disco"
receiver_socket.send(message.encode())
if BACK_BUTTON.checkForInput(MIRROR_MODE_MOUSE_POS):
print("back")
main_menu()
pygame.display.update()
def main_menu(): # main menu screen
message_sent = False # Flag to track if the message has been sent
while True:
if not message_sent:
message = "menu"
receiver_socket.send(message.encode())
message_sent = True
pitft.update()
screen.blit(BG, (0,0))
MENU_MOUSE_POS = pygame.mouse.get_pos()
MIRROR_BUTTON = Button(image=pygame.image.load("assets/buttons/mirror.png"), pos=(88,146), text_input="Mirror Mode", font=get_font(15), base_color=black)
ART_BUTTON = Button(image=pygame.image.load("assets/buttons/art.png"), pos=(228,146), text_input="Art Mode", font=get_font(15), base_color=black)
GALLERY_BUTTON = Button (image=pygame.image.load("assets/buttons/gallery.png"), pos=(159.5,202), text_input="Enter the Gallery", font=get_font(15), base_color=black)
TITLE = Button (image=pygame.image.load("assets/text/title.png"), pos=(162,63))
QUIT = Button (image=pygame.image.load("assets/buttons/quit.png"), pos=(20,20))
for button in [MIRROR_BUTTON, ART_BUTTON, GALLERY_BUTTON, TITLE, QUIT]:
button.update(screen)
for event in pygame.event.get():
if event.type == pygame.MOUSEBUTTONDOWN:
if MIRROR_BUTTON.checkForInput(MENU_MOUSE_POS):
mirror_mode()
if ART_BUTTON.checkForInput(MENU_MOUSE_POS):
message = "art"
receiver_socket.send(message.encode())
art_mode()
if GALLERY_BUTTON.checkForInput(MENU_MOUSE_POS):
gallery()
if QUIT.checkForInput(MENU_MOUSE_POS):
pygame.quit()
sys.exit()
pygame.display.update()
main_menu()
Team
Preston Whaley pw463
Preston worked on the front-end design for the PiTFT display. He also developed the mounting mechanisms for the wrist, display, and camera, making sure they were both secure and aesthetically integrated into the overall design.
Kunal Kumar kk858
Kunal worked on the backend processing algorithms, designing and optimizing the code for image analysis and display on the RGB matrix. He also handled the wiring for the parallel RGB matrix display.
Karim Pareja kgp33